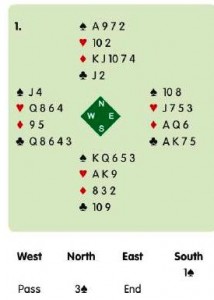
P1. West leads the ![]() 9 (second and fourth leads). You capture the
9 (second and fourth leads). You capture the ![]() J with the
J with the ![]() Q. How do you proceed?
Q. How do you proceed?
Assuming the lead is from a singleton or a doubleton and South has at least two clubs, you can see five tricks . However, partner does not know whether you
have good clubs or good hearts. So, before going on to give partner 0 diamond
ruff, cash a top club. 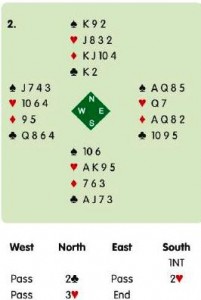
P2. West leads the ![]() 9 (second and fourth leads). You capture the
9 (second and fourth leads). You capture the ![]() J with the
J with the ![]() Q. How do you proceed?
Q. How do you proceed?
The situation is similar to the previous deal. You can envisage two diamonds, a diamond ruff and two tricks in your other strong suit. This time, you cannot tell partner that you have good spades by cashing the ace. You need to save your ace of spades to capture the king. Unless your partner is a good guesser, you will
need to find a way to signal for 0 spade. You do this by the way that you play your
diamonds. On the second round, you have no choice but to cash the ace. On the third
round, you do have a choice. You can lead the eight or the two. Since partner clearly cannot play back a diamond, this is 0 suit-preference situation. With a suit-preference signal, a high card asks for the higher of the remaining side suitsi a low card would ask for the lower side suit – a suit-preference signal never asks for trumps or the suit that you are leading . As spades rank higher than clubs, you lead the eight of diamonds on the third round. This way, partner knows to lead a spade after ruffing the diamond.
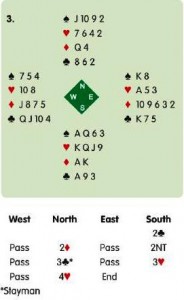
P3. West leads the ![]() Q followed by the
Q followed by the ![]() 10. Declarer takes the ten with the ace, cashes the
10. Declarer takes the ten with the ace, cashes the ![]() A-
A-![]() K and leads trumps from the top. You win the second round.
K and leads trumps from the top. You win the second round.
How do you defend?
You have the lead but do not want it. You must not play a diamond, which would give a ruff and discard – the crash of honours has marked the position. Nor must you play a spade: declarer is likely to have the ace-queen and will be keen to take the finesse. You should cash your king of clubs and exit with your last trump. Declarer ends up playing spades from hand, letting your king make.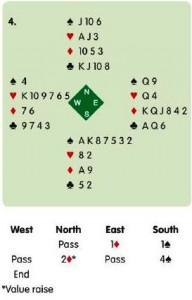
P4. West leads the ![]() 7; your jack loses to the ace. Declarer cashes the
7; your jack loses to the ace. Declarer cashes the ![]() A-
A-![]() K –West discards the
K –West discards the ![]() 10 on the second round. After that comes a club to the seven, jack and queen. What do you return?
10 on the second round. After that comes a club to the seven, jack and queen. What do you return?
You can cash one diamond. When all follow, you know a third round will not stand up. If you play another, declarer
ruffs and sets up the clubs. Then, the only hope left – a very good one in view of partner’s ten of hearts – is to switch to a heart. Your queen drives out the ace, establish ing the king as the setting trick.


