
Source: Play of the Hand: Playing Like the Hideous Hog
Trust the Opponents!
Although the defenders are trying to defeat our contract, at times they can’t help but provide us with assistance. Not only might they provide us with a favorable lead, we can generally trust the card they lead.
Why would they be so obliging? The defenders need to communicate with one another, and the way they do this is through their leads and signals. If they lead a low card, it is usually fourth highest; if they lead an honor, it is usually the top of touching cards. If they were to frequently deviate from their agreements, they would make our task as declarer more difficult, but they would also make their partner’s task next to impossible. Suppose we are declarer in 4![]() after the following auction:
after the following auction:
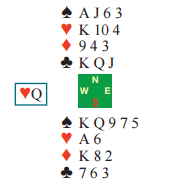
West leads the ![]() Q. We have three potential diamond losers and a club loser. One possibility to eliminate a diamond loser is the diamond finesse. After drawing trumps, we can plan to lead a diamond from dummy toward our hand, hoping East has the
Q. We have three potential diamond losers and a club loser. One possibility to eliminate a diamond loser is the diamond finesse. After drawing trumps, we can plan to lead a diamond from dummy toward our hand, hoping East has the ![]() A.
A.
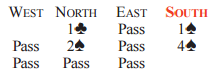
However, West’s lead of the ![]() Q has given us a much better option. On the reasonable assumption that West has led the top of touching cards, we can place the
Q has given us a much better option. On the reasonable assumption that West has led the top of touching cards, we can place the ![]() J in West’s hand. So, we should win the
J in West’s hand. So, we should win the ![]() A, draw trumps, and lead the
A, draw trumps, and lead the ![]() 6 toward dummy. If West follows with a low heart, we should confidently finesse dummy’s
6 toward dummy. If West follows with a low heart, we should confidently finesse dummy’s ![]() 10, expecting the layout to be something like this:
10, expecting the layout to be something like this:
West has made a perfectly normal lead, but it has given us the chance to make an ‘impossible’ contract. Without the lead of the ![]() Q, we were destined to lose three diamonds and the
Q, we were destined to lose three diamonds and the ![]() A. Isn’t it possible that West has made an unusual lead, such as the top of a doubleton, and the full deal is something like this?
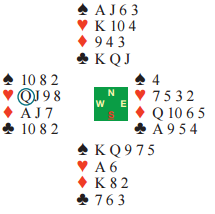
A. Isn’t it possible that West has made an unusual lead, such as the top of a doubleton, and the full deal is something like this?

Sure. If that’s the case, we’ll go down an extra trick in 4![]() if we finesse the
if we finesse the ![]() 10. We lose a heart as well as three diamonds and a club. But we weren’t making the contract anyway, so the extra undertrick isn’t a big deal. Sometimes we have to pay off to an unusual lead. Notice, however, that if East has the
10. We lose a heart as well as three diamonds and a club. But we weren’t making the contract anyway, so the extra undertrick isn’t a big deal. Sometimes we have to pay off to an unusual lead. Notice, however, that if East has the ![]() A, we still make 4
A, we still make 4![]() , even if our finesse loses to the
, even if our finesse loses to the ![]() J. Suppose this is the layout:
J. Suppose this is the layout:
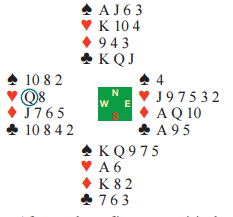
After our heart finesse surprisingly loses to East’s ![]() J, the defenders can take the
J, the defenders can take the ![]() A and
A and ![]() A, but that’s all. We can discard a diamond loser on dummy’s
A, but that’s all. We can discard a diamond loser on dummy’s ![]() K. In summary, finessing dummy’s
K. In summary, finessing dummy’s ![]() 10 has everything to gain and nothing to lose.
10 has everything to gain and nothing to lose.
To be continued…