
Source: WBU Newsletter Issue 93

Today’s hand is from the very popular Inter-City league on BB0. It builds on our recent theme of planning your play before playing to trick 1 (and re-planning at about trick 3 or 4 if the play provides further information).
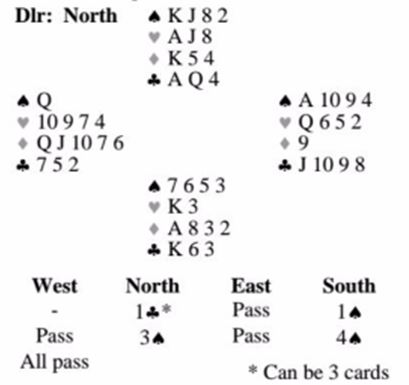
Board 3 Dealer South Vul: EW
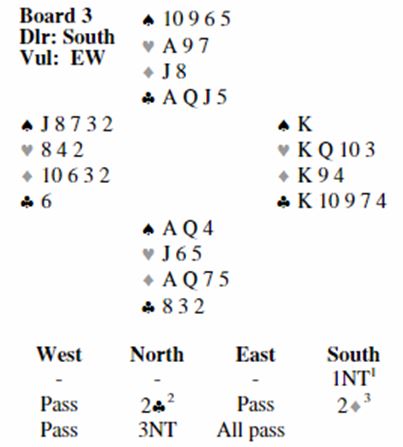
1) 12-14
2) Stayman
3) No 4-card major
After the lead of  3 we can count two spade, one heart, two diamond and two club tricks and will need two more. They will be most likely to come from the black suits (Plan A), though we can visualise an extra red suit winner if East holds all three of the missing honours (Plan B). East may also hold
  Q 10 x x or K 10 x x which will allow us to exert pressure on him (Plan C).
When the K appears at trick 1 we can make three spade tricks (ace, queen and 10), so we are now only one trick short. But we have to look after our entries. We play a club at trick 2 and insert the jack. If East tries to be “smart” and holds off his King he may soon find himself end-played so he wins and returns the  10. West pitching a spade. Declarer wins and plays queen and another spade on which East has some very uncomfortable discards.
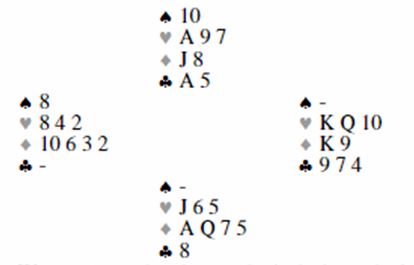 West exits with a heart which declarer ducks and East exits safely with the 9. This is the six-card ending:
Declarer now plays the ten of spades from dummy needing five more tricks. East is squirming now: a) if he discards a heart we make the 10, two hearts and two diamonds (taking the finesse); b) if he discards a diamond we can play a small diamond to the ace and another back to the jack leaving East to bare his K or pitch a club which will allow him to be end-played to lead away from his K; c) if he discards a club, declarer exits with dummy’s last club (discarding a diamond) and East is again end-played to lead away from this red-suit kings. (Note that case c) a sharp East can still beat the contract by exiting with the king of diamonds: declarer can cross to the  J but has no entry back to his hand to enjoy the queen as long as West holds on to his three cards in the suit to prevent declarer from simply cashing the ace and making the 7. But this line still represents the best chance of making.)
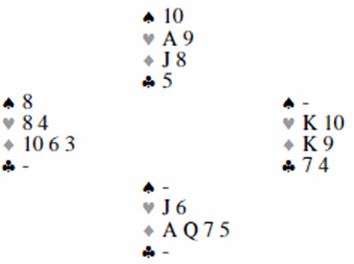
In summary: We had a Master Plan (A) to make three spades, three clubs, two diamonds and one heart, but also had our fall-back plan (B) to make an extra red suit winner when East has all three key cards: an extra 12.5% chance when Plan A fails. We also need to read the opponents discards so that we can resort to Plan C if the 6-card ending layout was:
Now if East throws the 10 we throw in West with the third Diamond.
Hand 2 This next hand is replayed from the 2013 Camrose series and follows our usual theme: plan your play at trick one and replan at trick 3 or 4 if events provide further information.
Lead: Q
We can see three club, two diamond and two heart tricks and need three more. They will probably come from the trump suit (Plan A). Our certain losers are two trumps. if the trumps are 3-2 with one of the honours on our left: and one diamond. We carefully win the first trick with the K so that if East has a singleton (likely from West’s lead) we can later play up to the ace and guarantee two diamond tricks.
Now we cross to the K and play a small trump, covering the queen. East wins and returns the 3. West is unlikely to play the Q from Qx so now that trumps seem to be 4-1, we are looking at three spade losers and one diamond for one down unless we can develop an endplay. We have to move on to Plan B (note that this is trick 4 – the time when Plan B is often put into effect). Win the club in dummy and play a small diamond towards the ace. If East trumps on thin air he has eliminated your diamond loser. so he has to discard (a heart or a club — it makes no difference). You now play the A and ruff the jack. then cash your remaining two club winners ending in hand.
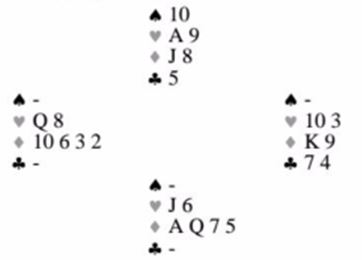
This is the 4-card ending:

You run the seven of spades to East’s 9 and he is end-played to give you two of the last three tricks. If he plays a trump you have no further trump loser, if he exits a heart, you ruff in hand discarding dummy’s last diamond. The contract is made.
Esta entrada también está disponible en: Spanish