

Source: December 2010 ACBL Bridge Bulletin ![]()
![]()
![]()
![]()
Careful play at trick one
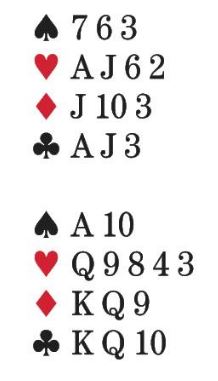
I have written a lot about the advantages of not using Stayman when you have a balanced hand. Sitting South, as dealer, you have this ordinary 16-count with both sides vulnerable:
![]()
Having balanced shape and having all the suits stopped, the player holding this hand opened 1NT. This seems like a decent idea. I am adverse to opening 1NT with five spades, but with five hearts, strong notrump values and all the suits stopped, 1NT is a great choice. There are some obvious reasons for this and one less-than-obvious reason: The ![]() 10 is a potentially good card. If partner has as little as J-x-x in spades, there are two stoppers if West leads the suit. Also, if dealer starts with 1
10 is a potentially good card. If partner has as little as J-x-x in spades, there are two stoppers if West leads the suit. Also, if dealer starts with 1![]() , he’ll have no good rebid after a 1
, he’ll have no good rebid after a 1![]() response.
response.
North bid 3NT, ending the auction. West led the ![]() 5. Surprised? Here is the layout:
5. Surprised? Here is the layout:
I rather like North’s 3NT bid. He has no shape and he has enough points that game is likely. West’s lead of the ![]() 5, however, is unexpected. How do you play?
5, however, is unexpected. How do you play?
If you are still thinking about the bidding and wondering why you are not in a cold 4![]() , your reaction is normal but not constructive. Spend your energy trying to make 3NT. Here’s a hint. West has led from the
, your reaction is normal but not constructive. Spend your energy trying to make 3NT. Here’s a hint. West has led from the ![]() K, as expected, given the lead. This means you can finesse at trick one successfully. What is your plan? Do not read further until you decide. Ready?
K, as expected, given the lead. This means you can finesse at trick one successfully. What is your plan? Do not read further until you decide. Ready?
⇓
⇓
⇓
⇓
⇓
⇓
⇓
⇓
⇓
⇓
⇓
⇓
⇓
⇓
Here is the full deal:
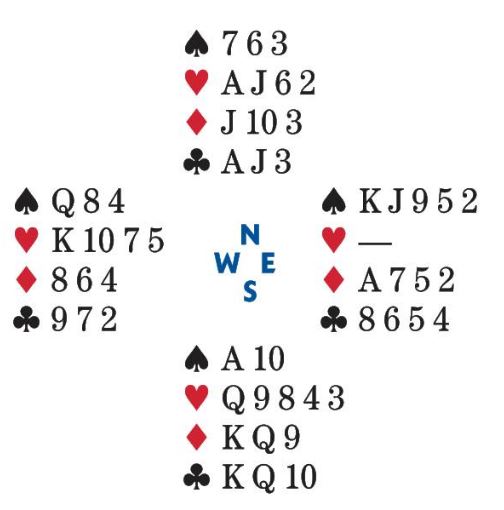
Here is what our declarer did. He played low from dummy. East showed out and South won the first heart with the ![]() 8, so West still had a heart stopper with his remaining
8, so West still had a heart stopper with his remaining ![]() K-10-7. South could have taken nine tricks by next playing on diamonds. That would give him a spade, three hearts, two diamonds, and three clubs.
K-10-7. South could have taken nine tricks by next playing on diamonds. That would give him a spade, three hearts, two diamonds, and three clubs.
But South noted there were heart tricks to be had, so he led a second heart and finessed the jack. Next he played the ![]() A and conceded a heart to West. West, by now, had gotten the message that spades was the suit to attack, so he led one, setting up the suit for East. East later got in with the
A and conceded a heart to West. West, by now, had gotten the message that spades was the suit to attack, so he led one, setting up the suit for East. East later got in with the ![]() A, and that was worth down one.
A, and that was worth down one.
Because most players were in 4![]() making four, making nine tricks in 3NT would have been a poor score. That was the excuse South used when it was pointed out that he had been cold for 3NT. Someone else then pointed out that an original spade lead would have set 3NT, given that West is able to stop the heart suit.
making four, making nine tricks in 3NT would have been a poor score. That was the excuse South used when it was pointed out that he had been cold for 3NT. Someone else then pointed out that an original spade lead would have set 3NT, given that West is able to stop the heart suit.
South was not sure who to believe at that point. He was lucky that no one had pointed out that he was cold for 11 tricks in notrump after the lead of the ![]() 5. How do you make 5NT on these cards given that you get a heart lead and not a devastating spade lead?
5. How do you make 5NT on these cards given that you get a heart lead and not a devastating spade lead?
Look at the hand diagram carefully. At trick one, play the ![]() 6 from dummy. If West has all four hearts, the
6 from dummy. If West has all four hearts, the ![]() 6 will win. Now South can take four more heart tricks because he still has the
6 will win. Now South can take four more heart tricks because he still has the ![]() 9 and
9 and ![]() 8 to use as “finessers” against West. South’s careless play at trick one cost him a valuable spot card by making him use the
8 to use as “finessers” against West. South’s careless play at trick one cost him a valuable spot card by making him use the ![]() 8 sooner than necessary.
8 sooner than necessary.
Esta entrada también está disponible en: Spanish