

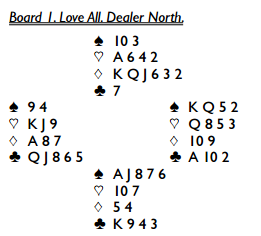 With good playing strength and easy rebids, most Norths will open their six-loser hand with 1
 . With the hearts and clubs reversed, a weak 2 would be a sensible alternative, but the side four-card major and maximum values will usually dissuade most of the weak-two aficionados.
Similarly, you could make a case for passing over 1 with the East hand, but with four-four in the majors, it’s often right to get into the auction with marginal values, and we expect double to be a popular choice. If East doubles, South will try 1 (or a modern 1
 transfer, a treatment which has considerable merit as it places the “strong” opponent on lead should responder’s suit become the trump suit). West will choose from amongst 1NT, 2NT, a cue bid of one of the enemy suits and a slightly heavy 3
 . West might shy away from both notrump with only one stopper in diamonds and a cue bid with the inherent complicated continuations, and settle for the straightforward 3 bid.
If 3 is passed out, West finds himself looking at four losers when the K is offside, and against various defenses he will lose a fifth trick. If North leads the diamond king, ducked all around, and follows with the diamond jack to the ace, West can ruff his diamond with the ten, but South just pitches a heart, to obtain a ruff in that suit later. A spade lead and heart shift, ducked by North (who can count on West’s not having four hearts when he jumped to 3) will also produce five tricks with the heart ruff. If South returns the spade jack at trick two, pinning West’s nine, West’s best try is to win in dummy and lead a heart to the king. To defeat 3 then, North has to duck – a much easier play to find “on paper” than at the table.
North isn’t really worth 3 over 3 in this scenario, but some players will risk it, hoping that when 3 would produce at least 110 for E/W, N/S might escape for -50 or -100 in 3. As 3 can be defeated, the uninhibited 3 turns a potential plus into a sure minus result, and West may double (to protect his equity in 3). Even 2 is too high if the defenders lead spades early, killing the entry to the king of clubs. If East starts with the K, and North ducks (best), another spade cuts the communication with dummy, and when declarer ducks a heart, a switch to ace and another trumps leaves declarer with three heart losers to go with the trump ace and the two black losers. Conceding 100 or 300 on the first deal of the session may serve to temper North’s optimistic bent. Or not.
If East passes over 1, South responds 1 and North rebids 2, which will often end the auction. A diamond lead, ducked, lets North make the contract by establishing the club king as his eighth trick, so in order to go plus, the defenders have either to lead a trump to the ace followed by a spade shift, or lead the K and time the defense correctly (see previous paragraph). Neither line of defense is particular obvious, so North will go +90 with some frequency. If West reopens 2 with a takeout double East may declare 2, which figures to go one down, but South may take the push to 3 with his prime values, doubleton support for a probable six-card suit, and potential ruffing value. E/W won’t double 3, but a N/S minus won’t be very good in any case.
At the tables where North passes as dealer, each of the other players might open, but it’s possible that the deal will be passed out. East might open 1, 1, 1, 1NT, or a Precision style 1, after which his side might buy the auction in a variety of contracts that include 1NT, 2NT, 2, 3, and 3, none of them likely to make.
Esta entrada también está disponible en: Spanish