
Source: http://wimpy.biz/bridge/ ![]()
![]()
![]()
![]()
There are four main factors to consider when counting declarer’s tricks: The bidding, the opening lead, the dummy, and partner’s signals.
The Bidding
You hold ![]() Q52
Q52 ![]() JT432
JT432 ![]() KQ6
KQ6 ![]() 73 Compare these two bidding sequences:
73 Compare these two bidding sequences:

Against sequence (a) the lead of the ![]() 3 is very attractive. Why? Because neither hand rates to have a long suit, and declarer will usually be fighting for nine tricks – often by giving up the lead two, three, or four times. There is a reasonable chance that you may be able to establish your hearts before he can establish 9 tricks in the other suits.
3 is very attractive. Why? Because neither hand rates to have a long suit, and declarer will usually be fighting for nine tricks – often by giving up the lead two, three, or four times. There is a reasonable chance that you may be able to establish your hearts before he can establish 9 tricks in the other suits.
However, against sequence (b), a heart lead is far less attractive. This time, both opponents have long suits, and the chances are that you may only get it once, if at all. Clearly, you must try to develop defensive tricks quickly, and the best chance for that is to lead the King of Diamonds.
This same type of reasoning is used any time either dummy or declarer is known to have a Long, Strong Suit. Attack! When neither opponent rates to have a long suit, especially when the opponents appeared to have clawed their way into a close game, make a more passive lead – usually low from your longest suit.
- The Lead
Partner’s lead, particularly if it is an honor card, clearly allows you, in 3rd seat, to easily count declarer’s tricks in that suit. Assume you are defending a no trump contract in the following two examples:

In the first example, East knows that declarer has exactly 1 spade trick coming. In the 2nd example, you know that declarer is entitled to 2 spade tricks (unless you aren’t playing that the lead of a Jack denies a higher honor). If that’s the case, you don’t know whether or not declarer has any spade tricks coming.
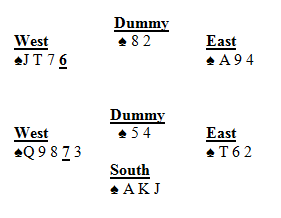
Here, West leads the ![]() 6, East wins the
6, East wins the ![]() A and returns the
A and returns the ![]() 9 to South’s King. West plays the
9 to South’s King. West plays the ![]() J, (denying the
J, (denying the ![]() Q), giving East a chance to count declarer’s tricks. If West plays the
Q), giving East a chance to count declarer’s tricks. If West plays the ![]() 7, it’s true that he gives East the count, but locating missing honors is usually more valuable.
7, it’s true that he gives East the count, but locating missing honors is usually more valuable.
This time, West leads the ![]() 7 and East’s
7 and East’s ![]() 10 loses to the
10 loses to the ![]() J. West now knows that South is entitled to three spade tricks, however East can’t read the position. Assuming East regains the lead and leads the
J. West now knows that South is entitled to three spade tricks, however East can’t read the position. Assuming East regains the lead and leads the ![]() 6, West plays the Queen! If West gets a chance to discard before East can lead, he discards the
6, West plays the Queen! If West gets a chance to discard before East can lead, he discards the ![]() Q!
Q!
When the opening leader plays an honor card underneath declarer’s honor (or discards an honor) in a suit the opening leader has already led, he denies a higher honor. This allows partner to count declarer’s tricks in that suit.
Note that these seemingly flashy discards never cost a trick. By simply discarding the highest card in the remaining sequence, you give partner helpful, and often crucial, information. In the above example, if West simply follows with the ![]() 3 the 2nd time the suit is played, East will assume West started with
3 the 2nd time the suit is played, East will assume West started with ![]() A 9 8 7 3 and no outside entry. Opening leader isn’t the only defender who can signal his honor strength to partner.
A 9 8 7 3 and no outside entry. Opening leader isn’t the only defender who can signal his honor strength to partner.
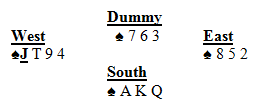 West leads the
 ![]() J and East knows immediately that declarer has 3 tricks in that suit. West plays the
J and East knows immediately that declarer has 3 tricks in that suit. West plays the ![]() 8 (
8 (![]() 2 if playing standard signals) to deny an honor. Now West can see as well that South has the 3 top spades. Playing any other card can lead to ambiguous situations where partner can’t be certain of the position, or if declaring is falsecarding.
2 if playing standard signals) to deny an honor. Now West can see as well that South has the 3 top spades. Playing any other card can lead to ambiguous situations where partner can’t be certain of the position, or if declaring is falsecarding.
In the lesson on “Signaling vs. No Trump Contracts” we discussed that when the opening lead is a small card and dummy wins the trick with a Queen or less, that 3rd hand (who obviously does not have a higher honor, or else he would have played it), gives the count signal. This enables the opening leader to gauge the distribution of the suit as well as the number of tricks declarer has available.
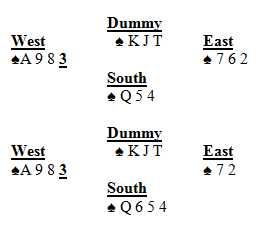 West leads the
 ![]() 3, dummy plays the
3, dummy plays the ![]() 10, and East the
10, and East the ![]() 7 (
7 (![]() 2) to show an odd number in that suit. West should read immediately that the suit is divided 4-3-3-3 and that there is a chance to develop his long spade.
2) to show an odd number in that suit. West should read immediately that the suit is divided 4-3-3-3 and that there is a chance to develop his long spade.
Same situation, but this time East plays the ![]() 2 (
2 (![]() 7) to show an even number of cards in the suit. This position is more difficult to read, but West should know that there is a good chance that South started with 4 spades to the Queen. The position will reveal itself with certainty on the 2nd play of the suit.
7) to show an even number of cards in the suit. This position is more difficult to read, but West should know that there is a good chance that South started with 4 spades to the Queen. The position will reveal itself with certainty on the 2nd play of the suit.
III. The Dummy
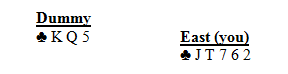
When dummy comes down, both defenders will usually have a good idea of their chances of beating the contract. For example, suppose dummy raises 1NT to 3NT and tables: ![]() Q543
Q543 ![]() AQ5
AQ5 ![]() Q65
Q65 ![]() J65. Defensive chances do not look bright, as the opponents rate to have 26 to 28 high card points. However, suppose you are sitting East, holding:
J65. Defensive chances do not look bright, as the opponents rate to have 26 to 28 high card points. However, suppose you are sitting East, holding: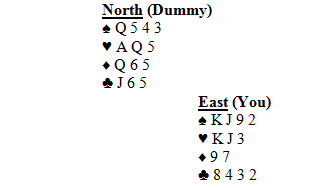
You should be optimistic about your chances of defeating this contract since both major suit queens in dummy are dead due to your holdings in those suits. In other words, it’s as if the dummy has 7 points instead of 11!
Conversely, some 11 point dummies will play like 11 because all finesses are working. The point is you must understand how to evaluate your hand in relation to the dummy.
Until now, we’ve concentrated on counting declarer’s tricks in the suit that was led at trick one. We now look at counting tricks in side suits:
 When dummy has a long suit, it is important that the defenders know as quickly as possible how many tricks can be taken in that suit. In this case, (unless South has a singleton or void – review the bidding), count declarer for 6 club tricks.
 This time, it will be difficult for South to realize more that one club trick. The point is, East knows that dummy’s long suit will yield little or nothing, but what about West?
Strangely enough, East’s defense will usually tell West whether or not the long suit is a factor. If East adopts a passive line of defense, and doesn’t panic by attacking new suits, West will get the message that there is little danger in the club suit. On the other hand, if East has three small clubs and sees the same club holding in dummy, he counts declarer for 5 club tricks and defends more aggressively – thus alerting partner that he fears the club length.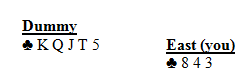
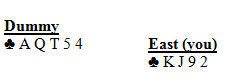
When either defender sees a strong suit in dummy, missing the ace, he cannot always be sure who has it. However, as the play develops, it becomes obvious. If the declarer, for example, shuns the suit, he must have the ace! If he did not, he would surely attack the suit as quickly as possible. Thus, East counts the declarer for either 4 or 5 club tricks, depending upon whether or not he attacks the suit immediately. The same reasoning holds true when a long suit missing the King hits the table: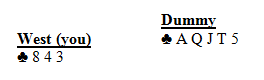
At first, West cannot be sure who has the King. If declarer attacks the suit immediately, East almost surely has the King. If Declarer leaves the suit alone, then it is declarer who probably has the King. (See the lesson on “Inferences”)
It becomes far more difficult to estimate declarer’s tricks when dummy has a shorter suit.
Depending on the bidding, declarer can have anywhere from 2 to 6 or even 7 club tricks.
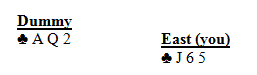
 This one is considerably easier. Declarer has either two or three club tricks, depending on who holds the Ace.
The most difficult of all is to count tricks in a suit in which dummy has a few small cards: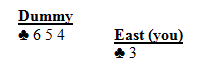
Assuming declarer has bid clubs, it is difficult to judge the club position. However, in general, it is better to have shortness, which means partner may have length (and hopefully strength), behind declarer, than to have, for example, ![]() Q 7 2 in front of the bidder.
Q 7 2 in front of the bidder.