
Source: www.cambsbridge.org
Many of you will be familiar with the Bols Bridge Tips, in which top players describe some hand on which they did something clever, ending with a pithy tip on how to improve your play. In this article, we describe how mediocre players do something catastrophic while trying to be clever, ending with a trite reminder of some obvious basic principle which is unlikely to be of any help at all.
You are playing a regional final. At favourable vulnerability you pick up: ![]() K 10 4
K 10 4 ![]() K 8
K 8 ![]() A J 4 3 2
A J 4 3 2 ![]() A Q 8
A Q 8
and your vulnerable RHO opens 2![]() , showing at least 5-5 in hearts and any other suit. You overcall 2NT, showing 15-18, next hand bids 3
, showing at least 5-5 in hearts and any other suit. You overcall 2NT, showing 15-18, next hand bids 3![]() and partner doubles, which is take-out style, but basically just shows values. Now you should maybe bid 3NT here, but with only one stop you’ll need to run a lot of tricks quickly and you decide to try to pick up a penalty and pass.
and partner doubles, which is take-out style, but basically just shows values. Now you should maybe bid 3NT here, but with only one stop you’ll need to run a lot of tricks quickly and you decide to try to pick up a penalty and pass.
One reason why you might bid 3NT is that you don’t know what to lead, but ![]() A looks safest so you try that. Good news – it doesn’t blow a trick for once. You see in dummy:
A looks safest so you try that. Good news – it doesn’t blow a trick for once. You see in dummy:
![]() 2
2 ![]() A 6 5
A 6 5 ![]() 10 9 6
10 9 6 ![]() K 7 6 5 4 2
K 7 6 5 4 2
Partner encourages and declarer follows with the queen. How do you continue?
There are generally two sensible strategies when defending against twosuited hands. Since establishment of the non-trump suit is usually vital for declarer, you should either lead trumps to hinder ruffing out the side suit, or force declarer hoping he will lose control before he can bring in the side suit. I invariably seem to choose the wrong method.
Where are the missing high cards? Partner clearly has ![]() K, and very probably
K, and very probably ![]() A for her double. That doesn’t leave declarer many values for his unfavourable 2
A for her double. That doesn’t leave declarer many values for his unfavourable 2![]() opener, and he might well have 11 cards in his two suits, which are fairly obviously the majors. He could be 6-5-1-1 or 5-6-1-1 which would leave partner with something like:
opener, and he might well have 11 cards in his two suits, which are fairly obviously the majors. He could be 6-5-1-1 or 5-6-1-1 which would leave partner with something like:
![]() A x x
A x x ![]() x x x
x x x ![]() K x x x
K x x x ![]() J 10 x or
J 10 x or ![]() A x x x
A x x x ![]() x x
x x ![]() K x x x
K x x x ![]() J x x
J x x
The latter felt more likely to me – partner would be keen to find a 4-4 spade fit. Maybe the hand is:

Well, with ![]() Q dropping, it looks like we can easily make 3NT, but it’s too late to worry about that.
Q dropping, it looks like we can easily make 3NT, but it’s too late to worry about that.
How shall we extract the maximum penalty? Actually, how can we extract any penalty at all? The spades aren’t a worry, but that club suit is not at all pleasant. Say we force him with diamonds, and he leads a club. We go in with the ace, but he has two entries to table, ![]() A and a spade ruff. With clubs 3-3 and hearts 2-2 he has no trouble ruffing a club, drawing trumps and entering dummy with a spade ruff. In fact we have to defend well to hold him to nine tricks. What on earth possessed me to pass 3
A and a spade ruff. With clubs 3-3 and hearts 2-2 he has no trouble ruffing a club, drawing trumps and entering dummy with a spade ruff. In fact we have to defend well to hold him to nine tricks. What on earth possessed me to pass 3![]() X?
X?
But hang on – maybe we can extract one of his entries to the clubs early. Eureka! We can lead ![]() K. By putting him in dummy at trick 2 we upset his timing for establishing the clubs, and we stop him ruffing two spades on table also. Yes,
K. By putting him in dummy at trick 2 we upset his timing for establishing the clubs, and we stop him ruffing two spades on table also. Yes, ![]() K is the only lead at trick two against that lie. And if it’s a very good day, maybe partner will turn up with
K is the only lead at trick two against that lie. And if it’s a very good day, maybe partner will turn up with ![]() Qxx and we can draw three rounds of trumps and really clock up the IMPs.
Qxx and we can draw three rounds of trumps and really clock up the IMPs.

Now if you’ve been following the drift of this article, you’ll guess that I switched to ![]() K at trick two and this was not a success. In an attempt to gain some support I set Paul Barden this problem. After some thought he replied, “Well I’d have bid 3NT. Now I think I’d probably continue diamonds at the table, but I can see the club suit is a worry. Maybe partner has
K at trick two and this was not a success. In an attempt to gain some support I set Paul Barden this problem. After some thought he replied, “Well I’d have bid 3NT. Now I think I’d probably continue diamonds at the table, but I can see the club suit is a worry. Maybe partner has ![]() Jx, so that the lie is:
Jx, so that the lie is:

Now we have to knock out a late entry to table. Our only chance is to switch to ![]() K and continue spades. Whatever declarer does we make 5 tricks. OK, I’ll lead
K and continue spades. Whatever declarer does we make 5 tricks. OK, I’ll lead ![]() K.” And indeed,
K.” And indeed, ![]() K is the only switch to set the contract on that lie.
K is the only switch to set the contract on that lie.
A digression on bridge etiquette is now in order. When a friend shows you a hand on which they clearly had a bad result, it is dangerous to state dismissively “Obviously you do X. What’s the problem?” That’s fine if they did do X, but should have done Y, then you can sympathise and say “You took the normal action; how unlucky.” But if they actually lost their marbles and did Y when the obvious X was right, they are unlikely to be elated. You owe them some thought, and eventually you can say euphemistically “That’s very imaginative; I wouldn’t have thought of that.” Suggesting an alternative plausible line which also fails is supremely well-mannered.
So now that we’ve heard the reasons for switching to a major king, what was the actual lie? I’m afraid it was:
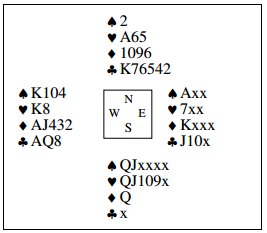
As he has only five trumps, the natural diamond continuation causes declarer to lose control, whichever black suit he tries to set up. In fact declarer would be two down for +500. Even a low heart switch would have set the contract. If declarer attacks spades, we win and lead ![]() K to dummy’s ace, and he’s in the wrong hand for establishing spades. Instead, if he attacks clubs partner’s
K to dummy’s ace, and he’s in the wrong hand for establishing spades. Instead, if he attacks clubs partner’s ![]() 7 comes into its own. (Give dummy
7 comes into its own. (Give dummy ![]() A7x and the only defence is to force with diamonds. On the
A7x and the only defence is to force with diamonds. On the ![]() 8 switch, eventually declarer draws partner’s last trump crossing to
8 switch, eventually declarer draws partner’s last trump crossing to ![]() 7 and cashes clubs.)
7 and cashes clubs.)
At other tables, South showed longer spades and the defence was clearer, so it was a good result for their system. Scoring -930 instead of +500 was a major contribution to our failure to qualify for the National Finals. Unfortunately, the team had several bad hands against Lincoln, who just pipped us. So what’s the eponymous bridge tip?
[box]“Don’t lead unsupported kings in declarer’s suits.”[/box]