
Source: www.mrbridge.co.uk ![]()
![]()
![]()
![]()
It can be difficult to persuade players of the importance of overtricks when playing Duplicate Pairs (normal club bridge). It is often just as important to make an overtrick as it is to make a contract itself. Have a go at this first example and then I will analyse the traveller afterwards. The contract and lead are routine:

Many declarers would be satisfied with ten tricks when the heart finesse works – three spades, three clubs, three hearts and the ace of diamonds. To beat the other pairs, you want an eleventh trick, which you can make by setting up dummy’s long diamond if the suit breaks 3-3. You win the first club with the king and duck a diamond in both hands. You win the next club with the ace, finesse in hearts and duck another diamond. After this, you win the third club in dummy, cross to the diamond ace and take another successful heart finesse. Finally, you cash the ace of hearts and long diamond; the ace, king and queen of spades take care of the rest of the tricks. At rubber bridge or IMP scoring, the overtrick would be of minimal value.
How much does this overtrick matter at duplicate pairs? Here is the traveller for the board played by 11 tables. Everybody finished in 3NT. Nine declarers made ten tricks, one made just nine tricks and one made 11 tricks.
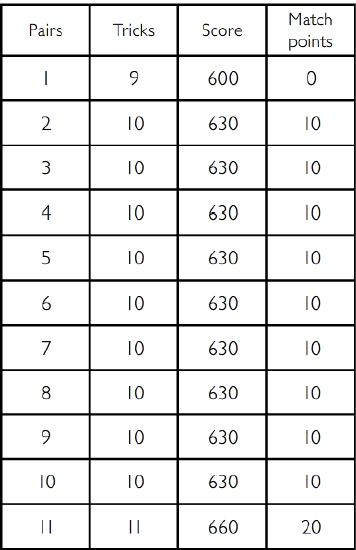
Not many travellers look as neat as this, but I hope this exhibits the difference overtricks make. The scorer, usually using a computer, gives each pair that has played the board a matchpoint score. The calculation for this is to give each pair two points for every pair they beat and one point for any pair they equal. Pair 11 beat the other 10 pairs to get (10×2) 20 points, the maximum possible score, often called ‘a top’. Pairs 2-10 beat one pair and drew with eight others (1×2 + 8×1 = 10). Finally, Pair 1 did not manage to beat anybody and so got 0. Players often ask how one arrives at a percentage score: if you played 11 tables of two-board rounds, 22 boards, your maximum possible score overall is 22 x 20 (the ‘top’) = 440. The scorer totals your matchpoints and expresses them as a percentage of the maximum. On the single board above, pair 11 got 100%, whilst pair 4 got 50% and Pair 1 got 0%. There is so much to note from the traveller. First of all, the fact that Pair 1 bid and made game was worth nothing. They made +600, yet scored 0%. Your aim is not only to score points but also to outscore everybody else. In fact, consider Pair l’s opponents: their score was -600, but that was the best any East-West pair managed so they got 100% for losing 600 points. This is not easy to grasp for many players. As you learn to take on board the nuances of the scoring, you will understand that your aim is simply to beat everybody else. Pair 11’s brilliant declarer play in squeezing out one extra trick showed only an extra 30 points on the scorecard but scored a ‘top’ on the traveller. On many deals, you need to try to put as much energy into making overtricks as you do into making the contract itself. Have a go at this easy 4![]() contract:
contract: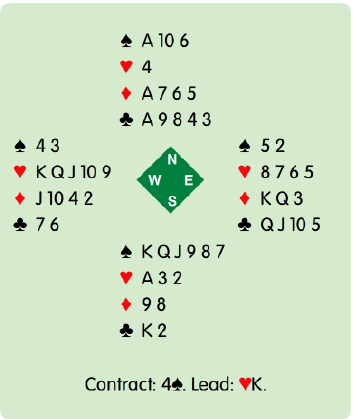
You have ten top tricks so making the contract is not difficult and in fact making two overtricks is relatively straightforward by ruffing two hearts in dummy; 4![]() +2 should get you a fair score, but it will not get you the top score. You cannot beat anyone who bids 6
+2 should get you a fair score, but it will not get you the top score. You cannot beat anyone who bids 6![]() , but can you make 4
, but can you make 4![]() +3? When declaring a contract at duplicate pairs, you need to explore every chance for extra tricks. This should always include any long suit you have. The club suit may well supply you a thirteenth trick on this deal – it will be relatively easy to develop the suit with a 3-3 break. However, if clubs are 4-2, you need to check you have the entries. If you need two ruffs to establish the suit, you require three entries in all to be able to make the winner at the end. You have one entry in the suit and the ace of diamonds, so you need to use one of your ruffing entries. This means you have to develop clubs at the same time as ruffing hearts. All of your trumps are high so you can ruff quite safely. You win the heart, ruff a heart, play the king of clubs, a club to the ace and ruff a club. Then you ruff another heart, cash the ace of spades, ruff another club and draw trumps. Finally, you cross to dummy’s ace of diamonds and cash your winning club, discarding your diamond loser. With a bit of luck, 4
+3? When declaring a contract at duplicate pairs, you need to explore every chance for extra tricks. This should always include any long suit you have. The club suit may well supply you a thirteenth trick on this deal – it will be relatively easy to develop the suit with a 3-3 break. However, if clubs are 4-2, you need to check you have the entries. If you need two ruffs to establish the suit, you require three entries in all to be able to make the winner at the end. You have one entry in the suit and the ace of diamonds, so you need to use one of your ruffing entries. This means you have to develop clubs at the same time as ruffing hearts. All of your trumps are high so you can ruff quite safely. You win the heart, ruff a heart, play the king of clubs, a club to the ace and ruff a club. Then you ruff another heart, cash the ace of spades, ruff another club and draw trumps. Finally, you cross to dummy’s ace of diamonds and cash your winning club, discarding your diamond loser. With a bit of luck, 4![]() +3 earns you a top.
+3 earns you a top.
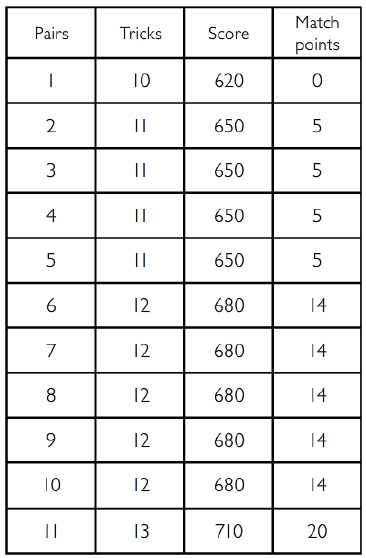
This time, making twelve tricks would have got you a reasonable scare 14/20 (70%) on the board, but making only one overtrick scores very poorly 5/20 (25%) and, once again, even though Pair 1 managed to make 4![]() and +620 points they get 0 from the scorer. The first two examples showed how, by making more overtricks, you outscore those in the same contract as you. Extra tricks to outscore players in different contracts can also be vital:
and +620 points they get 0 from the scorer. The first two examples showed how, by making more overtricks, you outscore those in the same contract as you. Extra tricks to outscore players in different contracts can also be vital:
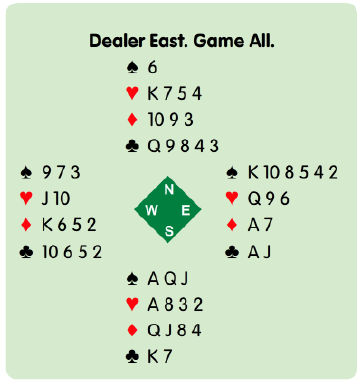
You finish in 1NT and, when dummy comes down, you are surprised to see that your opponents have a nine-card spade fit. Some will certainly play in 2![]() and perhaps some will play in hearts your way. It is not always easy to judge what will happen in other contracts, but 2
and perhaps some will play in hearts your way. It is not always easy to judge what will happen in other contracts, but 2![]() is likely to go one down for +100 to your side. This means you aim to make at least eight tricks. You will see the relevance of this as you make your plan. You win the spade lead and, guessing that the defenders are going to keep leading spades, you count three spade tricks and two hearts. Two extra tricks in diamonds will make your contract secure, but that is not your aim: you are aiming for at least eight tricks. This means you need to pursue three extra tricks and the best chance for that is playing on clubs – you are putting your 1NT contract at risk if things go wrong, but it is surely worth it as the traveller will show. You win the spade lead cheaply and, with so few entries to dummy, you need to play the king of clubs right away. If East held
is likely to go one down for +100 to your side. This means you aim to make at least eight tricks. You will see the relevance of this as you make your plan. You win the spade lead and, guessing that the defenders are going to keep leading spades, you count three spade tricks and two hearts. Two extra tricks in diamonds will make your contract secure, but that is not your aim: you are aiming for at least eight tricks. This means you need to pursue three extra tricks and the best chance for that is playing on clubs – you are putting your 1NT contract at risk if things go wrong, but it is surely worth it as the traveller will show. You win the spade lead cheaply and, with so few entries to dummy, you need to play the king of clubs right away. If East held ![]() A-J-x, he might duck the club, after which you would do best to play diamonds. In practice, East wins the club and continues with a spade, which you win and play a club to the queen: hoping for a 3-3 break or for one of the jack or ten to fall. When East’s jack does fall, you can develop the club suit by leading the nine. West wins the club this time and plays a third spade. You win this and take your tricks making eight in total: three clubs, three spades and the ace-king of hearts.
A-J-x, he might duck the club, after which you would do best to play diamonds. In practice, East wins the club and continues with a spade, which you win and play a club to the queen: hoping for a 3-3 break or for one of the jack or ten to fall. When East’s jack does fall, you can develop the club suit by leading the nine. West wins the club this time and plays a third spade. You win this and take your tricks making eight in total: three clubs, three spades and the ace-king of hearts.
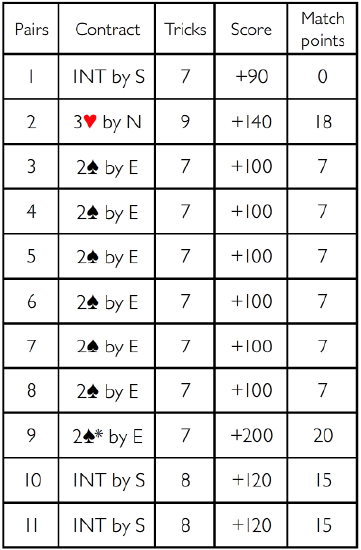
Look at the difference between 1NT just made and 1NT+1. You were quite right to risk your contract in the quest for an overtrick. The difference between making 1NT exactly and going one off is very little: a bottom is a bottom. The overtrick changed 0% to 75%. It is no surprise to see that the usual contract was 24, though one enterprising North-South doubled this to get an outright top.
[box]Conclusion
Knowing how the scoring works in duplicate is not necessary to enjoy your bridge. Having said that, if you want to understand how valuable overtricks are, you need to try to understand a little about the scoring. If you find it too complicated or simply do not like arithmetic, you need to take my word for it: overtricks are extremely important at Duplicate Pairs.[/box]