


Source: Mr Bridge
You are West in the defensive positions below. It is your turn to play. Both sides are using a 12-14 1NT.
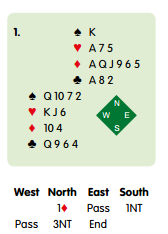
You lead the  2, won by the A (5 from South). Partner returns the 4, covered by the J. What do you do?
This is an easy one to start with. From the bidding, you place declarer with only three spades; this means the suit is ready to run. Since partner has more spades than you do, you want to get your high spades out of the way. So take the Q cash the 10 and play a fourth round. If your partner had the  K, it would not matter if you played the spades less efficiently – but there is no need to rely on that.
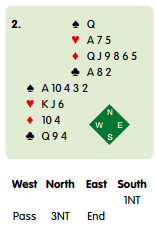
You lead the 3. Partner wins with the K and returns the 5, on which South plays the J. What do you do?
A count of points tells you that partner can have at most a queen as well as the K. You had 10 points, dummy had 13 and declarer had 12-14, leaving at most 5 for partner. This being the case, declarer has nine top tricks: the  A, the
  A-K and six diamonds. To defeat the contract, your side needs to win the first five tricks. Partner’s return of the 5 is good news: it must be fourth highest, which means South has only one spade left. If you take the A and 10, you will make only four spade tricks because partner will have to win the fourth round. Instead, having taken the A, lead a low spade: the 2 and hope partner holds the 9.
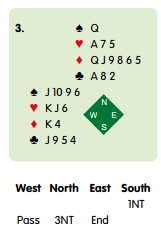
You lead the J. Partner wins with the A and returns the 4, covered by the 5. How do you defend?
This time, your side cannot run the spades straight away. For one thing, partner would have played the lower of touching honours at trick one if holding the A-K. For another, South needs the K to have 12+ points. Fortunately, as you have the K, you hope to enjoy the spades later. As the 2 is missing, partner may well have started with five spades. This being so, you want partner to win the fourth round. So win with the 9 (not the 6) and use the 10 to drive out the K, unblocking the suit.

You lead the Q. Partner plays the 7 (high encourages, low discourages) and South the 4. How do you continue?
Since the 6 and 3 are missing, you can reasonably assume the 7 is a high club, asking you to lead the suit again. While it may seem tempting to continue with the J to ‘squash’ dummy’s 10, you do not need to do that. Partner presumably holds the A or K and can beat the 10 anyway. If, mistakenly, you lead the J at trick two, declarer can block the clubs by taking the A and drive out your A. Lead the 5.