
Source: Master Play in Contract Bridge By Terence Reese
How Could I tell? I / How Could I tell? II
«There was no way in which I could tell.» How often is it true?
A Hint from Declarer
In the next example a misguided false card by declarer is the clue to the defence. South was in three notrump and West opened  3. Some players do not like to lead a low card from four rags, but it is a debatable point, and to lead fourth best is certainly not wrong.
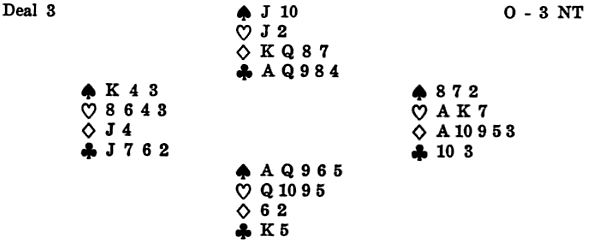
Declarer played the 2 from dummy, East played the king, and now South dropped the 9. South’s idea, if at all clearly formed, was to make the opponents think that he was short in hearth and to encourage a heart continuation. To an observant opponent, however, quite a different impression was conveyed. East could tell from the lead of the 3, with the 2 in dummy, that West had only four hearth. Therefore South’s play of the 9 must be a false card and the inference was that he was well upholstered in that suit. On this reasoning East switched to a low diamond, playing his partner for the  J. This play won five tricks for the defence, for when West came in with
  K he was able to return a diamond to his partner’s A-10.
Forcing an Early Decision.
Declarers are not always so heavy-minded. This is a hand from Britain vs. Austria in the European Championship of 1950:—shown below.
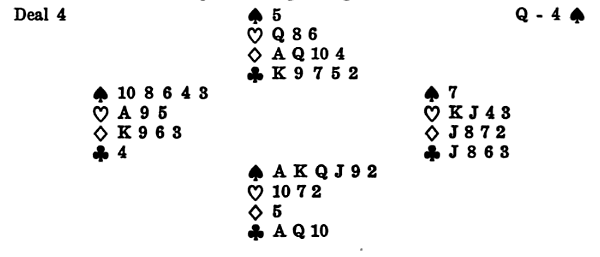
South dealt at game all. The British North-South played in 4 and after a club lead made the contract by finessing Q for a heart discard. At the other table the Austrian South, Karl Schneider, opened 4. West doubled and led 3. Declarer should perhaps have risked the finesse, but in practice he won with the ace, led 5 and played 9, putting West on play before he had had a chance to observe his partner’s discards.
West laid down A, but the message from his partner’s 4 was not altogether clear. After some thought West switched to a club, hoping that partner had the ace. East played low, South won with the  10, drew trumps, and won A, producing this position :—
On the last trump a heart was thrown from dummy and East also had to let go a heart. Then South cashed Q, exited with a heart, and won the last trick with dummy’s K. To what extent was West to blame?
His play would have been right had South held the K and something like Q-10-x. With that sort of holding, would South have ducked the first round of trumps? He would have had no reason to. The object of that play was clearly to lose the trump trick at a moment when West might find the wrong switch. From West’s point of view, South must be hoping to discard hearts on clubs, not clubs on hearts. Declarer played this hand with great skill: not so much the end game, which developed automatically, as the gambit at trick 2. He felt sure, of course, that West’s double included a trump trick, the more so as the opening lead suggested that West did not hold A-K.
It is often a good move for the declarer to give up a critical trick early. Deal 5 is another example:
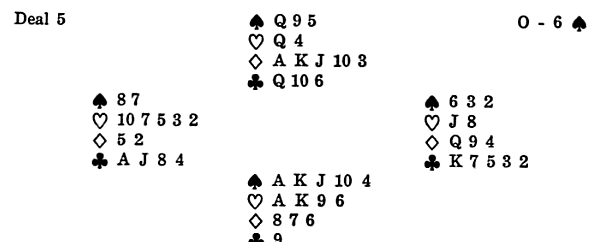
At game all North dealt and bid 1. South forced with 2 and North raised to 3. Without further communication to the enemy South bid 6.
With no attractive lead, West opened 8. South won with the jack and at once finessed the diamond. This was good play, for the finesse had to be faced sooner or later and the sooner it was taken the better the chance that East, if he did not hold A, would make the wrong return. If three rounds of trumps are drawn, for example, West has a chance to discard a low heart. When he won with Q East realised that he had to find his partner’s ace. With what seemed to him an open choice he led a heart.
«There was nothing to guide me,» he said afterwards. Nothing, except that on no reasonable construction of the cards could South be missing A and have so few hearts that they could be discarded on the diamonds. That would give West a six- or seven-card suit headed by the ace, which undoubtedly he would have led. A singleton club, on the other hand, South might well have.