
 Source: Bridge defense at Tricke one: A Book For Serious Bridge Players
Take your place in bridge’s hot seat. You are third hand, facing an expert declarer. Partner’s lead is on the table, and so is the dummy. You are preparing to make the critical first play. Are you thinking along the right lines? What arrangements of the cards are consistent with the information available to you? How can you determine the correct play?
The key elements in successful defense are visualization and communication. These elements go hand in hand, and they are greatly abetted by the system of parity leads introduced in this book. Using a signaling concept already familiar to all bridge players, you will be able to infer crucial information about the unseen hands. You will be ready to focus on how to help partner and hinder declarer.
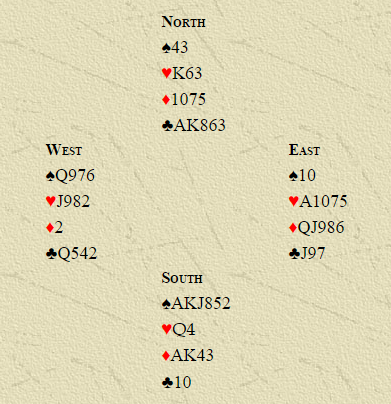
Try this problem I recently encountered. Partner leads a low heart against their game:
|
You cannot answer these questions definitively unless you know which heart spot partner led and what that card connotes. So think about how you would handle each of the possible spot cards using your favorite carding methods.
When you’ve reached your decisions:
⇓
⇓
⇓
⇓
⇓
⇓
⇓
⇓
⇓
⇓
The Parity Leads Solution
What Does Third Hand Know? How Much Information Can Be Transmitted by the Opening Lead?
Let’s analyze the basic elements of the situation. If you knew that declarer had three hearts, you should play the ten. Declarer will win his honor, and eventually lose the other two. He will not be able to reach the dummy, and the ace and king of clubs will be so much wastepaper. Wouldn’t that be nice?
If you knew that declarer had two hearts (necessarily headed by either the queen or the jack), you should win the ace. Then you need to return a club. That will cut declarer’s link to the dummy, so that he cannot score two hearts and two clubs even if he holds the queen of hearts.
Let’s see how various lead agreements might provide the information you need to get this right:
The old-fashioned standard agreement is to lead fourth best. Some add the proviso that fourth best guarantees an honor in the suit led. Unfortunately, if one is dealt three to an honor, one must also lead low. So if partner leads a low heart, you cannot determine whether he has three or four, and thus you can be successful on this deal only by making an inspired guess.
The modern expert treatment is to lead third highest from an even number and lowest from an odd number. That’s a little more informative, but it doesn’t clear up the ambiguity on this deal because partner’s lead would be the eight. The eight is consistent with partner’s holding being ![]() J98 or
J98 or ![]() J98x. You should play the ten in the first case, or the ace in the second. But you can’t tell which is the actual case.
J98x. You should play the ten in the first case, or the ace in the second. But you can’t tell which is the actual case.
Only parity leads solve the problem. A parity lead is simply the highest one can spare from an even number, the lowest from an odd number. That subtle difference is sufficient to resolve this deal. Partner leads the nine, which you can recognize as being from a four-card holding. Win the ace and return a club.
What happened when the hand was actually played? Parity leads were not in use, and East guessed wrongly to play the ten. Declarer won the queen, then played two rounds of clubs discarding his other heart. He next played the ace, king, and a third diamond, and the defenders were cooked. It didn’t matter whether West trumped the second diamond. The defense could only score one diamond trick and two trump tricks. Contract made.
To be totally fair, I must note what Los Angeles expert (and parity leads adherent) John Jones pointed out, that even grabbing the heart ace and shifting to a club does not guarantee defeating the contract. A declarer gifted with second sight could win the club, draw two rounds of trumps, cash the heart queen and then play the ace and king of diamonds. If West ruffs, he can cash another spade but then is forced to provide access to dummy and allow declarer to discard his losing diamonds. If instead West refuses to ruff, the same endplay is available by playing a spade.
In real life, however, declarer will take a spade finesse and the contract will be defeated.