
Source: Countdown to Winning Bridge

Do you remember sitting behind the wheel of a car for your first driving lesson? Like us, you probably wondered how you were supposed to watch the traffic while simultaneously making the car go where you wanted it to, let alone worrying about how you switched on the wipers or the turn signal. For many bridge players, the word ‘counting’ seems to evoke similar feelings of confusion and dread. This is particularly curious, since even small children can count to thirteen. The good news is that, with practice, counting at the bridge table can become as routine as driving a car or riding the proverbial bike. In this article, we’ll also show you how useful a skill it is to acquire.
Counting during the play of the hand takes many forms. Keeping track of the number of trumps played is where we all start. As we gain experience, we learn to pay attention to the cards played in more than one suit, so that we know whether, for example, dummy’s remaining low diamond is a winner. Having mastered these basic counting tasks, we learn to count the opponents hands too. In this article, we start at the very beginning by looking at how you should count — by using patterns. As we progress, so the hands become progressively more difficult. Even players with very little experience should have no trouble with our first hand; however, it allows us to introduce some useful ideas:
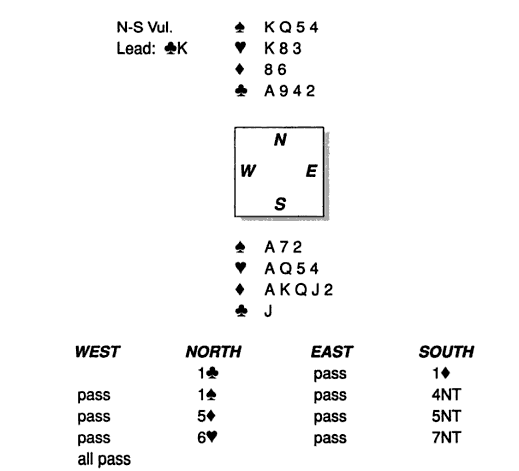
Lead: ![]() K
K
You must train yourself to count your tricks, even in simple contracts. This is something we are all taught as novices, and it is a process that even the expert player performs on every hand. Here you have eleven top tricks — one club, four diamonds, three hearts and three spades, so you must find two more to bring your total to thirteen.
Your twelfth trick, you hope, will come from the fifth diamond in hand and the thirteenth from a 3-3 break in one of the majors. (More experienced readers will have noticed squeeze chances, but we are ignoring them on this hand in the interest of emphasizing the mechanics of the counting process).
West leads the ![]() K, so you win the
K, so you win the ![]() A and immediately test diamonds. The skill you have acquired in counting trumps will make keeping an eye on the diamond suit a breeze, but it is worth mentioning quickly exactly how you should count the defenders diamonds. Deducting your seven diamonds from thirteen tells you the defenders have six diamonds. Although counting to six may not seem overly arduous, it’s still easier to think in terms of suit combinations.
A and immediately test diamonds. The skill you have acquired in counting trumps will make keeping an eye on the diamond suit a breeze, but it is worth mentioning quickly exactly how you should count the defenders diamonds. Deducting your seven diamonds from thirteen tells you the defenders have six diamonds. Although counting to six may not seem overly arduous, it’s still easier to think in terms of suit combinations.

In this instance, the defenders’ diamonds may break 3-3, 4-2, 5-1 or 6-0. Both defenders follow to the first diamond winner, so you can rule out the 6-0 breaks. When you cash the second top diamond, everyone follows again. As the suit must now break either 3-3 or 4-2, you don’t care who has the remaining diamonds. Rather than counting to thirteen, or even to six, you only had to count to two! Now that your long diamond is a winner, you have twelve tricks and just need to find one major breaking favorably.
How should you proceed?
Moderately experienced players would cash the diamond tricks, throwing clubs from dummy, while keeping track of any major-suit discards. Perhaps you note that the defenders have six cards in each major, and as each major-suit card is played you mentally reduce the number of outstanding cards. Until it becomes a habit, keeping track of both suits may be too much — it is also unnecessary. Choose one of the majors to watch — let’s say hearts. After cashing your diamonds, play off the top hearts. Because you have been counting the suit you will know whether the thirteenth heart is a winner. If it is, your problems are over. Otherwise, play four rounds of spades and hope for the best.
With practice, these basic counting processes become routine. After progressing beyond the beginner stage, most players carry them out without conscious thought. The next step in learning to count a bridge hand is to work out the distribution of an opponent’s hand. To appreciate the advantages of doing so, try playing a few hands with the defenders’ hands face-up on the table like extra dummies. When you first try to count a defender’s shape it seems like an impossible task, even though all the information is in your head. As with most things though, it is only a question of practice.
Let’s begin with a straightforward example to outline the thought processes you need to follow.
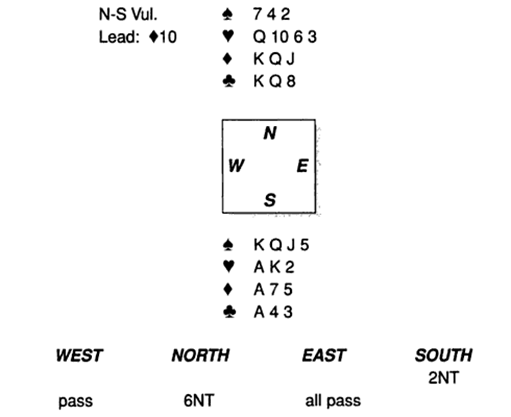 Lead: a diamond
As always, count your tricks before playing a card. Make a point of doing this on every hand and it will soon become a habit. Here you can count three diamond tricks, three clubs and three hearts on top. Driving out the ![]() A will develop two spade tricks. That makes eleven tricks, so you need to find one more. The extra trick must come from spades or hearts. Now it’s time to play. You win the diamond lead in dummy and play a spade to the king, which loses to West’s ace. After winning the diamond continuation, it is time to cash some winners to see what you can discover. Start by taking the top spades — if the suit breaks 3-3 you will have twelve tricks. Count the spades by watching to see if everyone follows to three rounds. (Remember that it is easier to count to three than to six.) West discards a diamond on the third round of spades, and you have reached the next point at which you should pause for thought.
A will develop two spade tricks. That makes eleven tricks, so you need to find one more. The extra trick must come from spades or hearts. Now it’s time to play. You win the diamond lead in dummy and play a spade to the king, which loses to West’s ace. After winning the diamond continuation, it is time to cash some winners to see what you can discover. Start by taking the top spades — if the suit breaks 3-3 you will have twelve tricks. Count the spades by watching to see if everyone follows to three rounds. (Remember that it is easier to count to three than to six.) West discards a diamond on the third round of spades, and you have reached the next point at which you should pause for thought.
As the spades have not broken, your twelfth trick will have to come from hearts. Should you play the three top hearts and hope the suit breaks 3-3, or cash the ace and king and finesse against the jack? The answer is that it is too early to decide yet. There is still information available that may help you make that decision. For now, fix the spade division in your mind — the defender on your left had only two. You play off your minor-suit winners and East shows out on the third diamond. That means there were originally five diamonds on your left, so you know seven of West’s cards — five diamonds and two spades. You cash your club winners, and when West discards a diamond on the third round, you are almost home. All that remains is to count to thirteen. West began with two spades, five diamonds and two clubs — that’s nine cards that are not hearts — and, therefore, four hearts. It is now easy to cash the ![]() AK and, if the jack has not fallen, to play a heart to the ten knowing your finesse will win. You could just as easily have counted East’s hand — four spades, two diamonds, five clubs (eleven non-hearts) and so only room for two hearts. Note that you need only count one defender’s hand. Trying to count both hands not only leads to mistakes but wastes valuable mental energy.
AK and, if the jack has not fallen, to play a heart to the ten knowing your finesse will win. You could just as easily have counted East’s hand — four spades, two diamonds, five clubs (eleven non-hearts) and so only room for two hearts. Note that you need only count one defender’s hand. Trying to count both hands not only leads to mistakes but wastes valuable mental energy.
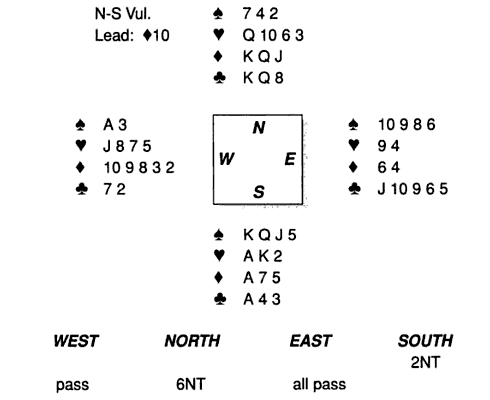
The four hands were:
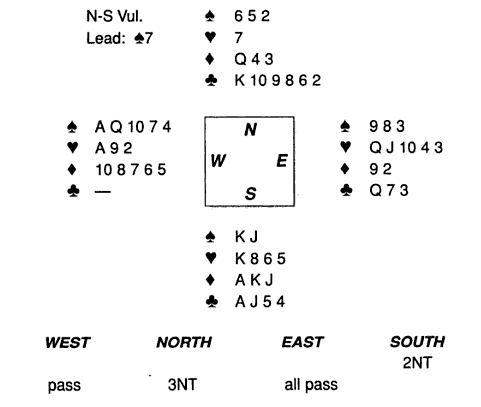
On the last hand, you were able to get an exact count of the defenders’ distribution. This will not always be possible, but that does not mean that a little discovery work will not pay handsome dividends. The next hand illustrates why any counting is better than none. If it’s not too early in the day, take over from declarer and cover the defenders’ hands.

The lead is the ![]() 7, and you win the
7, and you win the ![]() J as East follows with the three (the lowest missing card in the suit, suggesting an odd number of spades). Stop to count your tricks — one spade, three diamonds and (you hope) six clubs, which is plenty. Clearly, if the missing clubs break 2-1 there is no problem. The only danger is a 3-0 club break. So, which defender is most likely to have a club void?
J as East follows with the three (the lowest missing card in the suit, suggesting an odd number of spades). Stop to count your tricks — one spade, three diamonds and (you hope) six clubs, which is plenty. Clearly, if the missing clubs break 2-1 there is no problem. The only danger is a 3-0 club break. So, which defender is most likely to have a club void?
Based on the lead, perhaps you decide that West has five spades to East’s three, so he is more likely to be short in clubs. This in itself is true, but what if North had somehow become declarer and East had led his longest suit —maybe hearts — and he proved to have five of those. Would that make him more likely to be short in clubs? Not really. In both situations, the leader led his longest suit, which is hardly surprising, and you should be cautious about reading too much into that information.
So, is it a complete guess? Perhaps, but you do have one opportunity to gain more information before putting your eggs in one basket or the other —you can cash your diamond winners. Eureka! East discards a heart on the third round of diamonds. Your contract is now guaranteed. West started with five diamonds and, presumably, five spades. What are the chances he also has three clubs? None, for then East would have passed as dealer, not vulnerable, with eight hearts to the ace-queen-jack-ten! Your thoughtful play is rewarded when you lead a low club towards dummy and West discards. It is now a simple mat-ter to finesse against East’s ![]() Q on the way back and claim your contract. Counting the defenders’ hands is crucial to sound declarer play. The more you know about how the opponents’ cards lie, the better your decisions will be. The four hands:
Q on the way back and claim your contract. Counting the defenders’ hands is crucial to sound declarer play. The more you know about how the opponents’ cards lie, the better your decisions will be. The four hands:
Try your hand at the following problem:
You have eleven top tricks and your contract hinges on locating the ![]() Q. With no knowledge of the distribution, this is a 50-50 guess. Can you think of a way to improve those odds? Initially, both defenders are equally likely to hold the 4Q. Those odds will alter if the exact distribution of the spade suit is known. The defender with more spades is more likely to hold the queen:
Q. With no knowledge of the distribution, this is a 50-50 guess. Can you think of a way to improve those odds? Initially, both defenders are equally likely to hold the 4Q. Those odds will alter if the exact distribution of the spade suit is known. The defender with more spades is more likely to hold the queen:
| Spades held | Chance of holding the queen |
| 4 | 4/7 = 57.1% |
| 5 | 5 5/7 = 71.4% |
| 6 | 6/7 = 85.7% |
| 7 | 7/7 = 100% |
Let’s see what you can find out. You win the diamond lead and cash your hearts, noting that West follows only twice. Perhaps you decide that West has only two hearts (and thus eleven non-hearts) to East’s three, so West is more likely to hold the vital ![]() Q. This reasoning is correct, but it would be premature to play a spade to dummy’s ten as you have not yet completed all your discov-ery work. Can you find out more about the defenders’ hands? For example, wouldn’t it be nice to know how clubs divide? To do this you must first duck a club —you have to lose a trick at some point anyway. You win the diamond return and play off your minor-suit winners. On the third round of diamonds, East discards a spade, so you now know that West began with seven red cards (two hearts and five diamonds). When you cash the
Q. This reasoning is correct, but it would be premature to play a spade to dummy’s ten as you have not yet completed all your discov-ery work. Can you find out more about the defenders’ hands? For example, wouldn’t it be nice to know how clubs divide? To do this you must first duck a club —you have to lose a trick at some point anyway. You win the diamond return and play off your minor-suit winners. On the third round of diamonds, East discards a spade, so you now know that West began with seven red cards (two hearts and five diamonds). When you cash the ![]() AK, your forethought is rewarded because East discards another spade. Note that it is only because you ducked a club earlier that you were able to see three rounds of the suit.
AK, your forethought is rewarded because East discards another spade. Note that it is only because you ducked a club earlier that you were able to see three rounds of the suit.
You now know twelve of West’s cards — two hearts, five diamonds and five clubs. It is a simple matter to play a spade to dummy’s ace and run the jack on the way back, assured that your finesse will win. This is the full layout: 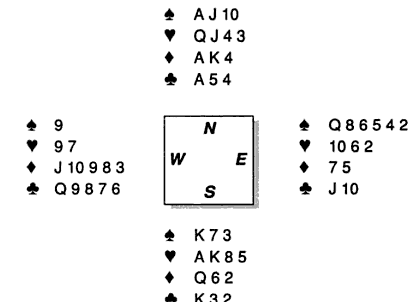
This hand provides an insight into why successful players are often known as lucky guessers. What started out as a 50-50 contract became a 100% certainty by the time the critical finesse was taken. Was it so hard? Did you do anything more complicated than count to thirteen?
LESSONS FROM THIS ARTICLE
• Always count your tricks before you play to trick one.
• Count missing cards by watching how suits break.
• Knowing the shape of the closed hands is an enormous advantage. Use your counting to work out one defender’s shape.
• The defender with more cards in a suit is more likely to hold a specific card in that suit.
• The more tricks you play (and thus the more defenders’ cards you see) before making a crucial decision, the more likely you are to ‘guess’ right.