
Source: www.abf.com.au By David Beauchamp
Sunday 12 June 2011
1. As Declarer, do not trump in the long hand, but do trump in the short hand
 Your contract is 4
![]() and you receive the lead of the King of clubs. How often have I seen players win the Ace in the dummy, ruff a club in hand and play trumps?
and you receive the lead of the King of clubs. How often have I seen players win the Ace in the dummy, ruff a club in hand and play trumps?
Trumping in the hand with the long trumps (South in this example) does not add to your trick count.
All it does is reduce your trump length thus putting your contract in jeopardy. We call it “the best defence to your own contract!”
However, trumping in the hand with the short trumps does add to your trick count.So let’s ruff a diamond in the dummy. The correct play is to win the Ace of clubs at trick one and finesse the Queen of diamonds. OK, so this fails and the defence leads another club which you have to ruff in hand. You should now cash the Ace of diamonds and ruff a diamond in dummy (the short trump hand) before starting on the trumps. After drawing trumps you can now play spades and make your 10 tricks.
If you do ruff a club in your hand at trick two then:
- a) you will have to play the diamonds from hand; and
- b) you will have no trumps left in your hand after you have ruffed a diamond and drawn the trumps. You will go down two, but you will be able to berate partner for his overbidding!
2. Defence – Do Not Establish Dummy’s Winner(s)
Your opening lead is the Ace of a suit and dummy hold QJ65 – please be cautious about cashing the King next because it will set up two winners (Queen and Jack) for declarer.
An Example hand:-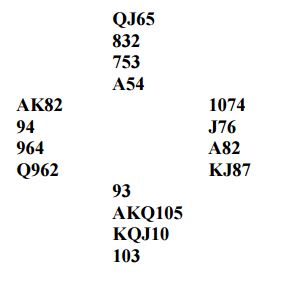 Contract: 4
![]() (S) We lead the Ace of spades and partner follows with the four. At this stage we must be careful not to continue this suit in the vain hope that partner has a doubleton 43 when declarer follows with a cunning nine. Declarer can set up a winning spade in the dummy but not if we knock out that ace of clubs immediately. At trick two we must shift to a small club to beat this rather ambitious contract.
(S) We lead the Ace of spades and partner follows with the four. At this stage we must be careful not to continue this suit in the vain hope that partner has a doubleton 43 when declarer follows with a cunning nine. Declarer can set up a winning spade in the dummy but not if we knock out that ace of clubs immediately. At trick two we must shift to a small club to beat this rather ambitious contract.
3. Covering Honours with Honours
As beginners we are all taught, when defending, to cover an honour with an honour. The reason for this is that, by doing so, we protect lower honours, either in our own hand, or, more likely, in partner’s hand. Here are a couple of examples:-
Example 1 When declarer plays the Queen from the dummy we must cover with the King to promote partner’s lower honours, usually the 10, but in this example, the nine. Had we not covered the Queen with our King then our side would have made no tricks at all in the suit. By covering the Queen with the King our side makes one trick, i.e. the nine, albeit on the fourth round of the suit. OK, most player know all that, but why, why, why, do they continue to cover honours when there is absolutely no chance at all of promoting any lower honour in partner’s hand?
 When declarer plays the Queen from the dummy, what is the point of sacrificing our King? There are no lower honours to be promoted in partner’s hand – how do we know that?
BECAUSE we can see them all in the dummy!!
Covering the Queen with our King can only be a help to declarer, and we are not supposed to be on his side. By covering the Queen with the King we allow declarer to make five tricks in the suit.
SO, here’s a rule for you:-
[box]“Cover an honour with an honour, but do NOT cover touching honours”.[/box]
A few examples may help:-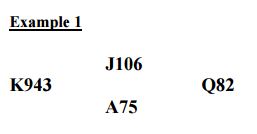 When declarer plays the Jack from the dummy, we must say to ourselves:
“Touching honours, do not cover”!
so we follow with the two. Declarer will probably let this run to our partner’s King. Note that, now that the Jack has gone, there are no longer touching honours in the dummy so the above rule no longer applies. If and when declarer subsequently plays the 10, this time we cover as per normal, in order to promote our partner’s nine. Declarer only makes one trick in the suit.
Now let’s look at what would have happened had we covered the Jack with our Queen. Declarer would win with the Ace and lead one back towards the 10, making two tricks in the suit.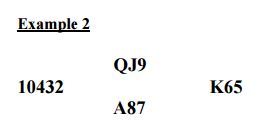 When the Queen is played from the table, we must NOT cover (touching honours). If we do cover with our King declarer will win with the Ace and finesse the nine on the next trick. He will make three tricks and we will take none. However, when we do not cover with the Queen with our King dummy’s Queen will win the trick of course, leaving J9 in the dummy. These are not touching honours so if declarer now plays the Jack we cover normally with our King, thus promoting partner’s 10. Only two tricks to declarer, and, more importantly, one for us.
So, the secret is out. For the rest of your bridge careers:
[box]COVER HONOURS WITH HONOURS, BUT PLEASE, DO NOT COVER TOUCHING HONOURS.[/box]
4. Unfortunate Discarding
How many tricks have we lost by pitching the wrong card(s)?
A reasonable rule when defending is to ‘maintain parity’ with dummy’s length.
Let’s say dummy has: ![]() K763
K763 ![]() K642
K642 ![]() 983
983 ![]() A2
A2
Declarer is in 4![]() and we are sitting over the dummy with:
and we are sitting over the dummy with: ![]() 2
2 ![]() T873
T873 ![]() AJ72
AJ72 ![]() K963
K963
Partner leads the ![]() Q which declarer wins with the ace in dummy and draws three rounds of trumps. We have to find two discards – not too difficult because we can spare two clubs. Many players would pitch a ‘useless’ heart but it is imperative that we hold on grimly to our four hearts. Declarer hand is:
Q which declarer wins with the ace in dummy and draws three rounds of trumps. We have to find two discards – not too difficult because we can spare two clubs. Many players would pitch a ‘useless’ heart but it is imperative that we hold on grimly to our four hearts. Declarer hand is:
![]() AQT54
AQT54 ![]() AQ5
AQ5 ![]() Q64
Q64 ![]() T5
T5
Our ‘useless’ heart pitch presents declarer with four heart tricks for his contract, but by retaining our hearts declarer will lose three diamonds and one club for only 9 tricks. To summarize, when we are defending a hand and partner makes a discard, we are often asked by declarer ‘what are your discards?’ A fair question I suppose and we answer truthfully ‘low encourage’ or ‘high encourage’ or whatever our agreed method are, but we are always tempted to say ‘TLKW’ (Throw Losers Keep Winners)!
5. Poor Leads
Some of our partners can be heard wandering round the bridge scene chanting ‘we lead our suits, they lead their suits’. If we lead a doubleton, especially 9x or 10x or Jx, whether it be against a suit contract, or against a no trump contract, it is highly unlikely that it is ‘our’ suit. It’s certainly not the opening leader’s suit, so it’s two to one that the suit belongs to the opponents and that we have helped to set it up. Yes, you may strike gold once in a while, and you can dine out on those occasions, but we suggest that the boring ‘4th highest from longest and strongest’ is the way to go. Defending 4![]() after declarer has shown hearts and clubs, dummy has shown spades what should we lead from?:
after declarer has shown hearts and clubs, dummy has shown spades what should we lead from?: ![]() Q83
Q83 ![]() T9763
T9763 ![]() JT86
JT86 ![]() K
K
Some players would lead the singleton ![]() K but this is silly, that is declarer’s second suit and we are not on his side. Guess what, we lead ‘our’ suit, the unbid one, i.e. diamonds, the DJ from this holding. Dummy comes down with:
K but this is silly, that is declarer’s second suit and we are not on his side. Guess what, we lead ‘our’ suit, the unbid one, i.e. diamonds, the DJ from this holding. Dummy comes down with: ![]() KJ976
KJ976 ![]() J
J ![]() Q52
Q52 ![]() T952
T952
Declarer wins the first trick in hand with DK as our partner encourages. After a heart to dummy’s jack declarer plays a club (his suit) to his jack and our king. We continue with the D10 diamond and declarer has to play his own club suit and must go down.
So another golden rule for you:
[box]If declarer has shown two suits then it is rarely, almost never, correct to lead his second suit. Leave that to him.[/box]
6. The pre-emptor Repeater
You open 2![]() with:
with: ![]() AQJ643
AQJ643 ![]() 84
84 ![]() 3
3 ![]() QT53
QT53
Your LHO overcalls 3![]() and your partner chimes in with 3
and your partner chimes in with 3![]() . RHO raises his partner to 4
. RHO raises his partner to 4![]() and it’s your go. The opponents are vulnerable and you are not. Should you consider bidding the 4th spade, maybe as a save, maybe to make? Our view is that if you are looking at your hand then that in itself is a mistake. Partner is aware of the vulnerability (I hope) and is the captain. If it is right to save then he will know what to do. For all you know partner may be waiting with his blood stained axe ready to double the opponent’s 4
and it’s your go. The opponents are vulnerable and you are not. Should you consider bidding the 4th spade, maybe as a save, maybe to make? Our view is that if you are looking at your hand then that in itself is a mistake. Partner is aware of the vulnerability (I hope) and is the captain. If it is right to save then he will know what to do. For all you know partner may be waiting with his blood stained axe ready to double the opponent’s 4![]() .
.
Again it’s a case of ‘Tell partner what you’ve got, but just once will do’.