


Read: Watson Bridge: Challenge #1
Louis H. Watson Bridge
from: “Watson the Play of the Hand at Bridge”
Watson’s Bridge Challenge #2, Chapter 10
1. Chapter X, Page 92 – Unblocking by Discarding
Quite often a lowly ten, nine, or eight may be a position to choke an otherwise vital suit to death. The declarer must prevent himself from being marooned in the wrong hand.
West opening lead is the Jack of Spades, and Souths contract is three no-trump.
How can you possibly make this contract?

2. Chapter XI, Page 105 – Ducking by Rufusing a Finesse
One rather unusual type of ducking play involves the deliberate refusal of a finesse. Let’s say that West’s opening lead against your three no-trump contract is the four of Diamonds. How should you play this hand?

3. Chapter XIII, Page 124 – A new type of Finesse
To finesse when holding three honors – two in one hand and one in the other – first lead up to the single honor, keeping intact the tenace position with the double honors.
Consider the following two situations. If you have no knowledge of where the Ace and Jack are, and can lead from either hand, how should these Diamond suits be played?
4. Chapter XIII, Page 125 – Unblocking the Trump Suit
The contract is five diamonds, and West leads the three of Spades. How should you play this hand?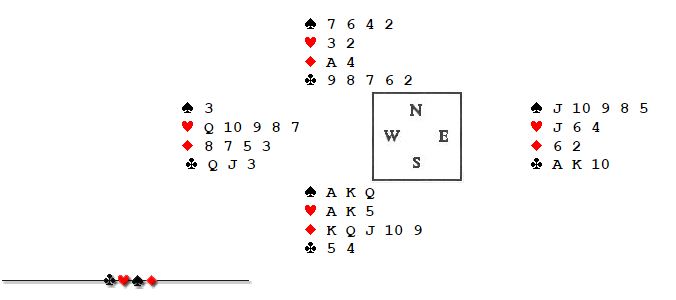
5. Chapter XIV, Page 131 – Postponing the Trump Lead for a Special Discard
The contract is four Spades and West leads the Queen of Hearts which you win with your Ace. You appear to have four losers, 1 Spade, 2 Hearts and 1 Club. The last Club loser can be ruffed in the dummy. Should you play three Diamonds in the hope of discarding a Heart or a Club. Or should you lead trump, knowing that East will surely take the two immediate Hearts, and discard a Club later on the Diamond. What do you do at the second trick?

6. Chapter XIV, Page 133 Another Way of Taking Discards before Leading Trumps
The contract is four Spades and West leads the Queen of Clubs. Do you lead trumps, or is there other buisness to do first?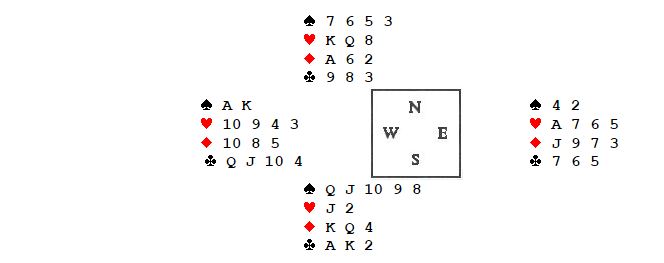 Figure out a strategy and then go down for Watson’s’s solution.
⇓
⇓
⇓
⇓
⇓
⇓
⇓
⇓
⇓
⇓
⇓
⇓
⇓
⇓
⇓
⇓
⇓
⇓
⇓
⇓
Watson’s Bridge Challenge #2 From the book
“Watson the Play of the Hand at Bridge“
Published in 1959 by HarperResource
1. Chapter X, Page 92 – Unblocking by Discarding
Quite often a lowly ten, nine, or eight may be a position to choke an otherwise vital suit to death. The declarer must prevent himself from being marooned in the wrong hand.
West opening lead is the Jack of Spades, and Souths contract is three no-trump.
How can you possibly make this contract?
Answer.
East covers the Jack with his Queen, and you refuse to win the trick. East continues by leading his King, and this time you decide to take your Ace. You realize that a switch to hearts will prove even worse than a continuation of Spades.
You have five tricks off the top (1 Spade, 1 Heart, two Diamonds, and 1 Club). To develope four more tricks, your best hope is a 2-2 break in Diamonds. You find, on playing your Ace and King of Diamonds, that both Diamonds do fall. If you have been careless, however, you will find that the third Diamond left in your hand has blocked you from the dummy.
It is essential in this hand to play then ten and the nine on the first two tricks.
2. Chapter XI, Page 105 – Ducking by Refusing a Finesse
One rather unusual type of ducking play involves the deliberate refusal of a finesse. Let’s say that West’s opening lead against your three no-trump contract is the four of Diamonds. How should you play this hand?
Answer.
East wins with the Ace and returns the seven, which you win with the Queen. You have six winners off the top (1 Spade, 2 Heart, two Diamonds, and 1 Club). Obviously you need to set-up three more Spade tricks. You lead the Queen of Spades and West covers with the King. What do you do now?
If you cover with the Ace of Spades, you will be cut off from the board. You must duck this trick to set-up dummy. When you return to your hand, take the Jack of Spades and lead the two toward your Ace.
3. Chapter XIII, Page 124 – A new type of Finesse
To finesse when holding three honors – two in one hand and one in the other – first lead up to the single honor, keeping intact the tenace position with the double honors.
Consider the following two situations. If you have no knowledge of where the Ace and Jack are, and can lead from either hand, how should these Diamond suits be played?
Answer.
Hand No. 1, with King-five-two in the dummy. Lead toward the King, hoping the Ace is in West’s hand. If the King holds, lead toward ten, hoping the Jack is in the East’s hand. At worst you get one trick. At best you can get three tricks.
Hand No. 2, with King-nine-two in the dummy. The nine-spot gives you a choice of plays. If you decide that West was the Ace and East the Jack, you lead toward the King, and finesse the ten on the way back. If you decide that East holds the Ace and West the Jack, you must lead low from dummy and finesse the nine-spot on the way back.
4. Chapter XIII, Page 125 – Unblocking the Trump Suit
The contract is five diamonds, and West leads the three of Spades. How should you play this hand?
Answer.
You preceive at once that the Hearts offer a ruffing possibility. South leads the Ace, then King and finally the five of Hearts. Which of dummy’s trumps do you use to ruff?
If you ruff with the four, you will be blocked on the board after taking the Ace of Diamonds. The only way you can get back to your hand is a Spade, which West will trump. That and two Club tricks will set the contract.
If you ruff with the Ace, you have unblocked trump. You can lead the four, clear trumps, and win all but two Clubs.
5. Chapter XIV, Page 131 – Postponing the Trump Lead for a Special Discard
The contract is four Spades and West leads the Queen of Hearts which you win with your Ace. You appear to have four losers, 1 Spade, 2 Hearts and 1 Club. The last Club loser can be ruffed in the dummy. Should you play three Diamonds in the hope of discarding a Heart or a Club. Or should you lead trump, knowing that East will surely take the two immediate Hearts, and discard a Club later on the Diamond. What do you do at the second trick?
Answer.
If you lead a trump at trick two, defense will win one Spade, two Hearts, and a Club later. The Club you discarded on your extra Diamond winner in the Dummy, does not solve the Club loser. This line of play will lose the contract.
You must lead the Ace of Diamonds, and then go the board in Diamonds in an effort to drop one of your losing Hearts before leading trump. If you do that with this set of hands, you make your contract.
This hand illustrates the absolute necessity of making a careful plan before proceeding with the play of any hand, no matter how simple it looks at first glance. Blindly leading trump would have lost the contract. By observing the crying need for a specific discard, he reached the right conclusion as to the proper play.
6. Chapter XIV, Page 133 Another Way of Taking Discards before Leading Trumps
The contract is four Spades and West leads the Queen of Clubs. Do you lead trumps, or is there other buisness to do first?
Answer.
After taking the opening lead, if you lead a trump, West will probably return another Club. After losing the lead next to other Spade winner, or the Ace of Hearts, a third Club lead will sink the contract since you still have to lose a Heart.
At trick two South needs to lead the Jack of Hearts, if East doesn’t cover the Jack, lead the two of Hearts. After regaining the lead, go to the board and lead your top Hearts, discarding the two of Clubs on the third Heart lead.