


By Larry Matheny for www.northerncoloradobridge.com
One of the most common mistakes made at the bridge table is the failure to stop and process the available information. Good habits must be developed both as a defender and as declarer. Here are some example hands to demonstrate.
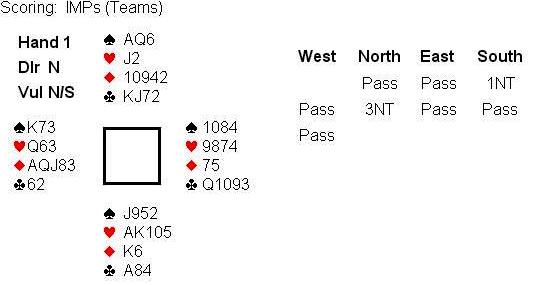
As West pondered his opening lead, he reflected on the auction. It appeared N/S had at least the 26 high card points usually needed for game. Adding his points to this, it was clear that East was not going to be of much help. So while the text book lead from this diamond holding is the queen, West started with the ace. After seeing dummy, West continued with a low diamond and this left declarer with no chance for 9 tricks. Declarer tried the heart finesse but West won and had 3 more diamonds to cash. At the other table, West led the queen of diamonds and this declarer soon had his 9 tricks: 3 spades, 3 hearts, 1 diamond, and 2 clubs.
This was a loss of 12 IMPs and the match. It pays to stop and think…and perhaps do a little math.
The auction provides very important information but is often forgotten once the play of the hand begins.
West began by leading a low spade to East’s queen. East shifted to a low club won by declarer’s ten. Declarer now led a low diamond and without much thought, West played low. Now it was an easy task for declarer to play the ace of spades followed by three rounds of clubs pitching dummy’s last diamond. Now the king of diamonds was led covered by the ace and ruffed in dummy. Declarer ended with eleven tricks losing only two spade tricks. This was a zero for E/W.
Let’s look at the information available to West. Declarer held the jack of spades, maybe the queen of hearts, and to justify his bidding, the KQ of both minors. Therefore it was imperative that West win the ace of diamonds when the suit was led. This was a simple problem of remembering the auction and using a little math. Once again, West did not stop and process the data available to him.
Here is another hand where the auction should have told guided the declarer.
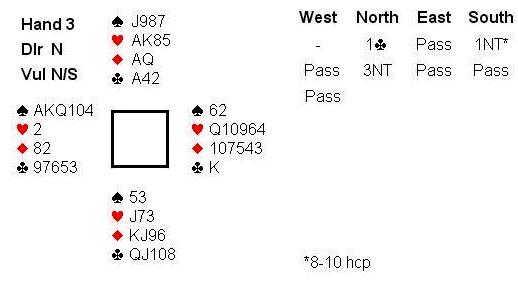
West led the top three spades with East discarding a heart on the third round. Next, West led a low club and with little thought, declarer ducked losing to the king. Declarer now had nine tricks and wondered how some declarers had found an overtrick.
Now it is not a certainty that West would have bid if he held the king of clubs along with the AKQ10X of spades, but many would. In fact, this particular West was known to be an aggressive bidder. Declarer should have at least stopped to give this possibility some thought. While it was highly unlikely the king of clubs was singleton, no one wants to take a finesse that is odds on to lose.
If you are sometimes frustrated when a strong player takes so much time with a hand, it is because all of the possibilities are being considered before a decision is made.
We continue our theme of using the auction to show us the way.
The jack of diamonds was led and East won the first three rounds. East then went passive and exited with a trump. Declarer had no trouble pulling trumps and claiming ten tricks. East’s thought process should have been “South’s jump to game marks him with most if not all of the missing honors. Therefore, my best hope of defeating the contract is a fourth round of diamonds in an attempt to promote the jack (or less likely the queen) of hearts.” As you can see declarer could no longer make the hand. Down one would have been a tie for top. Defense can be difficult but it’s easier if you put in the effort.
While this may seem difficult, it starts with just taking the time to consider what the available information is telling you.