Source: [ilink url=»http://www.acbl.org/»]2006 ACBL Bulletins[/ilink]
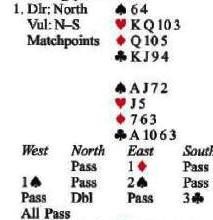
Test your queen-placing in the following problems.
West leads the ![]() K and continues with the
K and continues with the ![]() J;
J; ![]() Q,
Q, ![]() A. On the next diamond West ruffs and shifts to a low spade to the
A. On the next diamond West ruffs and shifts to a low spade to the ![]() 4,
4, ![]() K and
K and ![]() A. You might have escaped with a plus by passing 2
A. You might have escaped with a plus by passing 2![]() doubled, but the bidding is over. If you can guess the
doubled, but the bidding is over. If you can guess the ![]() Q, you can get out for down one at 3
Q, you can get out for down one at 3![]() … , and minus 100 may be worth some matchpoints. Who has the
… , and minus 100 may be worth some matchpoints. Who has the ![]() Q?
Q?
West had two diamonds and only four spades since East needed three-card support for his raise to 2![]() . But if West had four hearts, he’d have responded 1
. But if West had four hearts, he’d have responded 1![]() , showing his major suits «up the line.» So East’s pattern was 3-4-5-1. Cash the
, showing his major suits «up the line.» So East’s pattern was 3-4-5-1. Cash the ![]() A and lead to the
A and lead to the ![]() J, knowing the finesse will win unless East had 14 cards.
J, knowing the finesse will win unless East had 14 cards.
West leads the ![]() K and continues with the
K and continues with the ![]() 2 to East’s ace. East then shifts to the
2 to East’s ace. East then shifts to the ![]() 10. Who has the
10. Who has the ![]() Q?
Q?
Give the opponents credit for logical defense. When West led the ![]() 2 at the second trick, East knew he’d started with four spades, leaving South with three. If East had Q-x-x in trumps, he’d have assured a set by leading a third spade and forcing dummy to ruff. Since East has given you a chance to finesse in trumps, don’t. Cash the
2 at the second trick, East knew he’d started with four spades, leaving South with three. If East had Q-x-x in trumps, he’d have assured a set by leading a third spade and forcing dummy to ruff. Since East has given you a chance to finesse in trumps, don’t. Cash the ![]() A K, hoping West has Q-x .
A K, hoping West has Q-x .
West leads a low trump, and East takes the ace and shifts to the ![]() Q. Your king loses to West’s ace. East wins the next club with the
Q. Your king loses to West’s ace. East wins the next club with the ![]() 10 and leads the jack, and you ruff. You draw trumps, finding that West started with J-7-2. East throws a club. Next you cash the
10 and leads the jack, and you ruff. You draw trumps, finding that West started with J-7-2. East throws a club. Next you cash the ![]() A and lead another heart, on which West plays the
A and lead another heart, on which West plays the ![]() 10 and
10 and ![]() Q. On the
Q. On the ![]() J he discards a diamond, so who has the
J he discards a diamond, so who has the ![]() Q?
Q?
After the plodding auction North-South had, West would prefer a passive opening lead. A trump lead is usuall safe, but to lead from J- x- x could have saved declarer a guess or cost a trick outright. If West had a worthless diamond holding, he would often have led a diamond instead. Play West for the ![]() Q.
Q.


