
Source: La Eliminacion
Read Part I Click Here
There are two main methods of extracting an extra trick in a borderline contract. These are the known as ‘elimination play’ and ‘squeezes’. Both techniques require the ability to plan ahead and plot your way through the minefield of the difficult contract. Whenever you are short of just one trick it is usually possible to make your contract, unless the defenders are able to cash enough tricks to set you from the outset. Success demands the ability to appreciate in advance the problem(s) posed by a particular hand and it is simply not good enough to play out the cards and hope for the best. If you do this you will be defeated as often as you make your contract and such a negative approach is very wearing on partnership confidence. The most common method employed to gain an additional trick is elimination play. Usually the technique requires the declarer to ‘eliminate’ dangerous side suits, before exiting to one or the other defenders to force them into making an awkward return.
Example 3
| West | North | East | South |
| 1 |
Pass | ||
| Pass | 2 |
2 |
Pass |
| Pass | 3 |
3 |
Pass |
| 4 |
Double | The End |
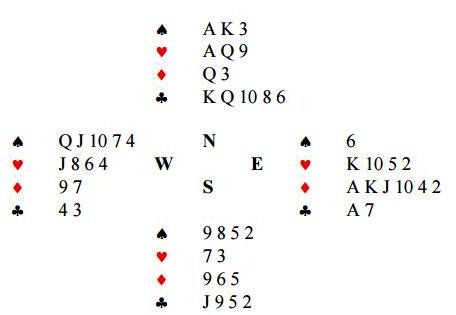
West finally wakes up to just how strong his partner’s hand is and makes the good bid of 4![]() once his partner has insisted that they should be playing the final contract. Since he is maximum for his original pass of his partner’s opening, he should invite with 3
once his partner has insisted that they should be playing the final contract. Since he is maximum for his original pass of his partner’s opening, he should invite with 3![]() once his partner has taken the opportunity to show a reverse over North’s overcall. South leads a small
once his partner has taken the opportunity to show a reverse over North’s overcall. South leads a small ![]() to North’s
to North’s ![]() Q. How would you play the contract? You have one
Q. How would you play the contract? You have one ![]() loser and one
loser and one ![]() loser, so the contract depends on whether you can restrict your trump losers to one. Clearly North must have both the
loser, so the contract depends on whether you can restrict your trump losers to one. Clearly North must have both the ![]() A Q, since he is not likely to have doubled the final contract after his partner has passed throughout without a strong trump holding.
A Q, since he is not likely to have doubled the final contract after his partner has passed throughout without a strong trump holding.
The problem with the hand is that it is difficult to get to the dummy to lead the ![]() J from the table. There is only one chance to create an entry and that is via a ruff. There are two possibilities. You can play North for the
J from the table. There is only one chance to create an entry and that is via a ruff. There are two possibilities. You can play North for the ![]() A Q 9 and three
A Q 9 and three ![]() s, in which case you will be able to ruff the third
s, in which case you will be able to ruff the third ![]() as high as necessary to gain an entry. Now you will be able to lead a
as high as necessary to gain an entry. Now you will be able to lead a
trump through North. This may well work, but you are still no nearer to making your contract. North will simply rise with the ![]() A on the first round and you will need yet another entry to finesse the
A on the first round and you will need yet another entry to finesse the ![]() Q. In any case, it is not likely that North will hold three
Q. In any case, it is not likely that North will hold three ![]() s, given the competitive auction. However, there is a reasonable chance that he will hold two
s, given the competitive auction. However, there is a reasonable chance that he will hold two ![]() s and the high trumps. If this is so, you have the possibility of creating an entry by dropping the doubleton
s and the high trumps. If this is so, you have the possibility of creating an entry by dropping the doubleton ![]() Q from North and then exiting with the
Q from North and then exiting with the ![]() J and discarding the losing
J and discarding the losing ![]() from the dummy. If North did start with
from the dummy. If North did start with ![]() Q X, he will be forced to ruff your
Q X, he will be forced to ruff your ![]() J or concede an extra
J or concede an extra ![]() trick. This loser-on-loser play that is designed to create a necessary entry is a relatively common occurrence. The difficulty is not so much in the execution of the play, but in spotting that the possibility exists in the first place.
trick. This loser-on-loser play that is designed to create a necessary entry is a relatively common occurrence. The difficulty is not so much in the execution of the play, but in spotting that the possibility exists in the first place.
Once North ruffs the third ![]() , declarer only requires one entry to the dummy to deal with the trump suit. Note how effectively North is endplayed at this point. He can cash the
, declarer only requires one entry to the dummy to deal with the trump suit. Note how effectively North is endplayed at this point. He can cash the ![]() A, but his continuation is doomed. Note also that it does not matter if South wins the third round of
A, but his continuation is doomed. Note also that it does not matter if South wins the third round of ![]() s with the
s with the ![]() Q. Declarer should still discard his losing
Q. Declarer should still discard his losing ![]() , because this guarantees that the contract cannot be defeated by more than one trick. If he ruffs instead, North will simply over-ruff, cash the
, because this guarantees that the contract cannot be defeated by more than one trick. If he ruffs instead, North will simply over-ruff, cash the ![]() K and the
K and the ![]() A and then exit with the
A and then exit with the ![]() K. Now declarer will have to concede another two trump tricks and will go two down. While it is important to make your contract if you can, it is equally important to limit your losses when the breaks do not go your way.
K. Now declarer will have to concede another two trump tricks and will go two down. While it is important to make your contract if you can, it is equally important to limit your losses when the breaks do not go your way.
There are occasions when winning a cheap trick can turn out to be horribly expensive. This next hand was one of the deals in a Teams match. Both declarers finished in the same contract and both got the same opening lead, but one managed to make the contract while the other went down in flames.
Example 4
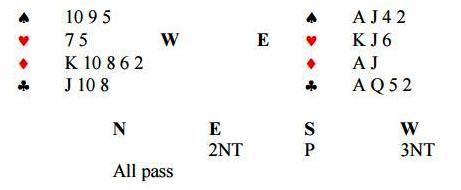
Not unreasonably, West decided he had enough to raise his partner to game with his five-card ![]() suit and three 10s. South led the
suit and three 10s. South led the ![]() 3. Declarer won North’s
3. Declarer won North’s ![]() 9 with the
9 with the ![]() J and immediately cashed the
J and immediately cashed the ![]() A. Then he played a small
A. Then he played a small ![]() to the
to the ![]() J, which North took with the
J, which North took with the ![]() K. Declarer covered the switch to a low
K. Declarer covered the switch to a low ![]() with the
with the ![]() J, but this was taken by South’s
J, but this was taken by South’s ![]() Q. South then exited with a low
Q. South then exited with a low ![]() to the
to the ![]() 10.
10.
At this point declarer had seven sure tricks (one ![]() , three
, three ![]() s and three
s and three ![]() s) but it was not at all clear where the remaining two tricks could be found. If declarer cashed the
s) but it was not at all clear where the remaining two tricks could be found. If declarer cashed the ![]() K he was likely to be setting up South’s
K he was likely to be setting up South’s ![]() Q, but if he did not take it immediately it was likely to disappear forever, since there was no guaranteed entry back to the dummy. His best chance to create additional tricks seemed to be in the
Q, but if he did not take it immediately it was likely to disappear forever, since there was no guaranteed entry back to the dummy. His best chance to create additional tricks seemed to be in the ![]() suit. If the honours were divided, he might well make the extra tricks in
suit. If the honours were divided, he might well make the extra tricks in ![]() s.
s.
Accordingly, he cashed the ![]() K and then ran the
K and then ran the ![]() 10. South won with the
10. South won with the ![]() Q and cashed the
Q and cashed the ![]() Q. Now declarer was in a hopeless mess. He had already discarded one
Q. Now declarer was in a hopeless mess. He had already discarded one ![]() on the
on the ![]() K and he was now forced to discard a second. South then returned a third round of
K and he was now forced to discard a second. South then returned a third round of ![]() s and the hand collapsed completely. Declarer could cash his three remaining winners, but he was then obliged to exit with a
s and the hand collapsed completely. Declarer could cash his three remaining winners, but he was then obliged to exit with a ![]() concede the last two tricks. The kindest description of this plan is to call it careless. Compare the result with what happened in the other room…
concede the last two tricks. The kindest description of this plan is to call it careless. Compare the result with what happened in the other room…
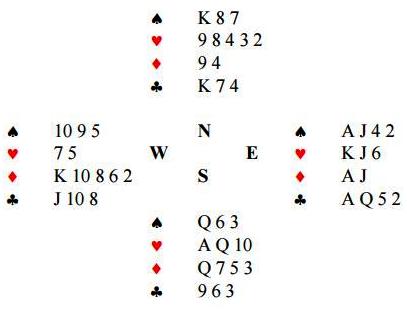
Once again South led a low ![]() . The first action declarer took was to count his sure tricks. He had only seven (one
. The first action declarer took was to count his sure tricks. He had only seven (one ![]() , three
, three ![]() s on the lead and three
s on the lead and three ![]() s once the
s once the ![]() K had been forced out.) Where were the other two to come from? The
K had been forced out.) Where were the other two to come from? The ![]() suit would probably produce an additional trick, but how could the declarer develop the suit without inviting a dangerous
suit would probably produce an additional trick, but how could the declarer develop the suit without inviting a dangerous ![]() switch, particularly if North was left on lead? But perhaps the
switch, particularly if North was left on lead? But perhaps the ![]() suit could be developed? Still, the suit could not be established without a second sure entry. There seemed no way out of the dilemma – until the declarer had a sudden brainwave.
suit could be developed? Still, the suit could not be established without a second sure entry. There seemed no way out of the dilemma – until the declarer had a sudden brainwave.
The ![]() K was the second entry, of course! He won the lead with the
K was the second entry, of course! He won the lead with the ![]() A and overtook his
A and overtook his ![]() J with the
J with the ![]() K. Now he simply exited with the
K. Now he simply exited with the ![]() 10, discarding a
10, discarding a ![]() from hand. This had the effect of eliminating
from hand. This had the effect of eliminating ![]() s as a safe return and South was end-played in four suits!
s as a safe return and South was end-played in four suits!
When South won the third round of ![]() s, he was helpless. A return in either of the black suits would have set up an entry to the dummy and finessed North at the same time. A
s, he was helpless. A return in either of the black suits would have set up an entry to the dummy and finessed North at the same time. A ![]() return would set up the suit for four tricks. Declarer would win on the table, discarding a
return would set up the suit for four tricks. Declarer would win on the table, discarding a ![]() or a second
or a second ![]() from hand. Before cashing the remaining
from hand. Before cashing the remaining ![]() he would run the
he would run the ![]() J. Once this had held the trick he would probably be home free, since there would be no reason why South would duck the first
J. Once this had held the trick he would probably be home free, since there would be no reason why South would duck the first ![]() if he held the
if he held the ![]() K. Now declarer will cash the remaining
K. Now declarer will cash the remaining ![]() and run the
and run the ![]() 10. This will be enough for his contract (one
10. This will be enough for his contract (one ![]() , four
, four ![]() s and four
s and four ![]() s).
s).
When in with the ![]() Q, South’s best shot is a
Q, South’s best shot is a ![]() , hoping that his partner has the
, hoping that his partner has the ![]() J. He must attempt to exit with the
J. He must attempt to exit with the ![]() Q on the first round. Declarer will win the
Q on the first round. Declarer will win the ![]() K and exit with a
K and exit with a ![]() to the
to the ![]() J and
J and ![]() K. North will return a
K. North will return a ![]() and South will win the
and South will win the ![]() A and exit with the
A and exit with the ![]() 10. Unfortunately for him it is declarer who holds both missing
10. Unfortunately for him it is declarer who holds both missing ![]() honours and this unlucky defence will simply concede the overtrick.
honours and this unlucky defence will simply concede the overtrick.
When you can win a trick cheaply but it costs you a vital entry, then reject it. I cannot stress enough the importance of entries and the maintenance of communication between the two hands. There is no better illustration of this point than this hand. The second important point to stress is never play too quickly to the first trick, even if the play does seem marked. Take the time to make a plan before playing any card at all. This will often make the difference between success and failure – and never costs!
There are occasions when the possibility of an elimination play exists, but it is difficult to perceive.
Will continue…